Saturday, November 30, 2013

Mad Tea Party Chalkboard by Tonya Gibbs

Hi everyone, I hope you are having a fantastic weekend.   Today I would like to share with you a Mirror that I altered with Marion's super fab Mad Tea Party Line. 


I used these patterns from the paper collection


I bought an unfinished wooden mirror and frame from a craft supply story.   I removed the mirror and stained the sides and back with Tattered Angels' Cork Glimmer Mist.  This frame is 11.25 x 9.25 inches with a 5x7 opening.


After the Glimmer Mist has dried, I covered the entire frame with Claudine Hellmuth Studio Matte Medium.  I applied several coats to the top surface to insure my paper overlay would adhered to the wood.  The Matte Medium seals the wood and the Tattered Angels spray.


I then added my paper to the top of the frame.  To insure that I didn't get the hole cut incorrectly, I decided to affix the entire paper to the frame.  I used a brayer to make sure all the air bubbles were removed from the paper. I allowed the paper to completely dry. 
 
 
Then I flipped the frame over and trimmed out the hole with an x-acto knife.   I then applied another coat of Matte Medium over the paper.  Set this aside and allow it to dry.


Then I painted several coats of this Glass Chalkboard Paint by DecoArt on the Mirror. Make sure you don't leave streak marks in the paint, and allow it to dry completely between each coat. If you plan to paint a surface that is going to be used in a dishwasher, make sure you follow the directions on the bottle and bake the item to cure the paint. Since I'm not washing this project, I let it completely dry for 24 hours before I wrote on the chalkboard.  


Once the board was completely dry, I added it back to the frame.  I rubbed chalk over the board and cleaned it off with a dry paper towel.  This seasons the board so that the chalk runs smoothly over the surface.  Then I decorated the left and bottom to make the frame more interesting.  


I made the flower that is used for the focal piece.
 
Here is a Youtube video showing you how I made these flowers.


This frame will make a nice Christmas gift for one of my friends.  I love how simple it was to create. It could be hung on the wall, or propped on an end table with a decorative easel. 
 
Thanks for stopping in today,
 
Tonya Gibbs

Thursday, November 28, 2013

A birthday layout with Nirvana by Nadia

Hi everyone!

It's Nadia here with you today sharing a layout I created with the Nirvana collection. 

"Five"


Here are some close ups..


Here are the papers from the Nirvana collection I used


Thank you so much for having a look today. 

Don't forget to subscribe!!

For more of my work please see my blog HERE


Bye for now :) 

Tuesday, November 26, 2013

A little Christmas crafting

I know it is Thanksgiving week and I certainly don't want to bypass the Day of being Thankful for all our blessings!   BUT I know in order to get my holiday crafting and gifts done, I need to start NOW!!  Today I am sharing a project that was very fun and will make a great decoration OR gift!
I started with an old book I found at the thrift store.   Take off the covers and follow the instructions found here:  http://www.readersdigest.com.au/make-a-christmas-tree/.  These are very fun and easy to make so my 14 year old daughter made this one!  We used a candle holder as the Base.  I glued the bottom of the tree to the candle holder  with hot glue. 

The Little embellishments for the garland were made with punches using the clock side of the Mad Tea Party papers.   I also cut out the doilies from the striped side of this paper to make the larger embellishment. 
The charms were made with the Epiphany crafts epoxy and metal charm kits!  
The center large embellishment has a lolly center on top of the doilie made with old book paper. 
The garland was made by sewing on the twine and adding little pennants and circles  with about an inch in between each one.  I then wrapped the garland around the book tree and lastly added my center embellishment.  The top star is a hatpin with a glitter star punched from sparkle paper.  

A closeup of the details of the garland.  I added some little bling to make it sparkle after I sewed the pennants and circles on the twine. 
These are the papers I used- Perfect for this tree project!  I love the doilies!!! 
I am THANKFUL this week for being able to work with such amazing products and that YOU came by to see!!!  Blessings to you and yours in this holiday season!!
Thankfully,
Colette!

Sunday, November 24, 2013

Christmas Card designed by Tonya Gibbs

Hi everyone, I hope you're having a fantastic Sunday.  Today I would like to share with you a simple yet very elegant Christmas card I made with Marion's Designs. 
 
 
Merry Christmas Card Designs by Tonya A. Gibbs at Psychomoms.com  #card, #holiday, #Christmas, #marionsmithdesigns
 
 
I kept the design simple, so that the card could easily be duplicated and mailed. For the background, I decided to use white card stock that was dry embossed with a Cuttlebug Swiss Dot embossing folder.   This gave texture to the card, without a lot of fuss.
 
 
Then I trimmed a small piece from the B-side of the Mad Tea Party - Wonderland paper to make a banner. I love the softness of this paper and thought the mint was a nice "trendy" color for my card.   Since I only used a 2 inch strip, I can easily duplicate this card multiple times from one 12x12 sheet of paper.
 
 
Chalk boards are super trendy right now too, so I used the one from Marion's Scarlet Printable Collection for my sentiment. I can easily reprint the chalkboard as often as I need to since this piece is a digital file. This collection is currently on sale for half price in Marion's Store.   Click here for more details.  
 
Finally, I added a twine bow, and poinsettia to give the card a festive look. The rich red velvet hand made flower gave this card the WOW factor.
 
Here is a tutorial on how to create the Poinsettia.


I love that this card makes a wow statement without a lot of effort. Handmade cards are so special to me, because I know how much time and effort went into designing them.  Do you make your holiday cards?  If so, please share them with us on Facebook. Make sure you tag me in the post, so that I can admire your work.
 
Thank you for stopping in today,
 
Tonya Gibbs


Saturday, November 23, 2013

Making Your Own Embellishments - Part 1

Hi ladies

One of the first scrapbook classes I ever taught (nearly 10 years ago now!) was about creating your own embellishments from left over scraps of paper and other items.   It came about because at the time I had a very limited scrapping budget, and I was loathe to throw anything away in case it came in handy one day! 

I have to say that it is still one of my favourite things to do - create a one of a kind embellishment for use on a layout or card.  So, over the next few weeks, I'd like to share with you some of my methods.

Part 1 - Layered Embellishments

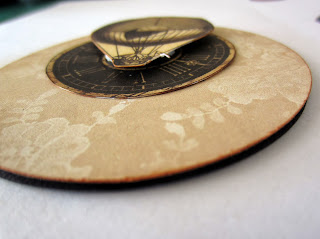
This is an ideal way to use up left over images from detailed papers.  The secret here is to layer with foam tape to get dimension and interest.  Here's one that I made using Nirvana papers and Mad Tea Party fussy cut flowers.


Start by assembling the items you want to use, and create a background layer from plain cardstock (I used black).  Ink the edges to get rid of unsightly white core edges and to create a more seamless layering effect.


Arrange the items in a fashion you are happy with, then gradually adhere the pieces using foam tape in between the layers.


And another:


I love to make these when I go to a crop night.  It requires very little preparation and supplies, and is actually quite a therapeutic way to spend the evening!

Join me again in a few weeks for Part 2 of Handmade Embellishments. We'll be looking at ways to create unique cabochons.

Thanks for stopping by!

Maggie

Thursday, November 21, 2013

Smile - A Layout Using Mad Tea Party by Kim Price


Today I have another layout to share using the gorgeous Mad Tea Party collection - this time with an inky misted background using Dylusions ink spray. 

As anyone who knows my style would know I love nothing better than to create something arty and, as luck would have it, this style of scrapping looks fantastic teamed with this collection. 

I've chosen Calypso Teal, sprayed it onto my thick cardstock background and tilted it all to let that gorgeous color run and form patterns. After my cardstock was completely dry I then created a banner from the coordinating patterned papers, overlapping them up for a fun look.

Next I began to build up my layers surrounding my photographs. I've used cut outs from the ephemera papers behind my photographs for some added dimension as well as some fussy cut rose elements. I then stamped the large doily image from Tea Party Acrylic Stamp Set onto white cardstock - once in rose red and once in turquoise - fussy cutting the images out and tucking them between my layers either side of my photographs.


Here is a closer look at the rose coloured doily stamp along with a checkerboard embellishment I created using a 1 inch round Shape Studio tool from Epiphany Crafts. This is such a great way to use up some of those small leftover pieces and looks fantastic.


Supplies used:


Thanks for calling in today, I hope you enjoyed my project. You can find more of my creations on my blog here.

-Kim Price


Tuesday, November 19, 2013

Sweet - A Layout Using Mad Tea Party by Kim Price


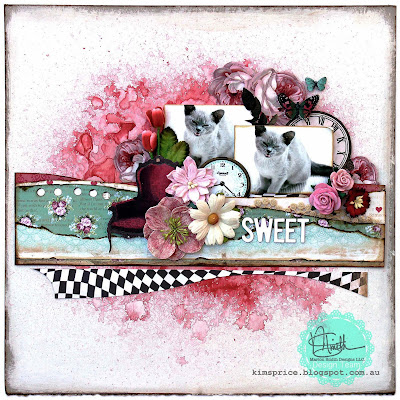
I just cannot get enough of the Mad Tea Party collection. I love everything about it from the colours, the patterned papers and the gorgeous matching elements. Today I want to share another project I've created with this line featuring a too sweet photograph of my little friend who follows me everywhere at home - my gorgeous silver Burmese, Anika. I just adore this photograph taken of her when she was just a wee babe and it looks wonderful tucked in amongst the gorgeous pinks and aqua tones of Mad Tea Party.

I've used similar techniques to my previous post A Steampunk Style Christmas Layout, creating a distressed layered border using various papers from Mad Tea Party, tucking in my photographs, a few elements from the patterned papers, flowers and some antiqued lace. 


I'm just loving the gorgeous vintage style red armchair image - so I've added that tucked in behind a few flowers. Anika loves nothing better than curling up into a ball on a soft comfy chair so this is the perfect touch!


On this section of layout I've used some clock face images to create a layered effect and the finishing touch are those two sweet little butterflies hovering above. 


Supplies used:


Thank you for calling in today, you can find more of my designs on my blog here

-Kim Price