Showing posts with label Psychomoms. Show all posts

Thursday, June 26, 2014

Farewell Post by Tonya Gibbs


Wow - I can't believe it has been a year already. Where has the time gone?  Honestly, I feel like I just started this creative journey.   I've enjoyed sharing with you guys each week, and I've made a lot of amazing friendships during this past year. My team mates are some of the world's most talented, and what an honor to serve next to them.  Marion is an amazing person, and I'm so happy that I can call her my friend!  Thank you for this awesome opportunity, and I look forward to future endeavors!

As my final project share, I thought I would create a masculine layout of my nephew and his first grade teacher.  I'm using pieces from Never Grow Up, Motley, Garment District and Nirvana in today's layout!


It is so fun to mix and match your collections to create the perfect project.   I love that all of Marion's lines coordinate so well! 


I have prepared a process video showing you how I made this layout!


It has been such an amazing year.  I've made some amazing friendship!  Thanks for all your comments, feedback, and love!  Let's stay in connected!  Follow the link to my blog and subscribe to all my social media outlets. 


Thanks for stopping in today, 

Tonya Gibbs

Resources for Today's Layout Share:
  • Marion Smith Designs: Nirvana - Documented
  • Marion Smith Designs:  Never Grow Up Never Never
  • Marion Smith Designs: Never Grow Up Treasure Map
  • Marion Smith Designs: Never Grow Up Wild & Free
  • Marion Smith Designs: Never Grow Up Sleep Over
  • Marion Smith Designs: Never Grow Up Self Portrait
  • Marion Smith Designs: Motley Anthology
  • Ranger Ink: Tim Holtz Distress Ink Refill Black Soot
  • Studio Calico:  Wood Veeners  Arrows, Speech Bubbles
  • Glitz Designs: Glitter Tape
  • Tim Holtz: Idea-O-logy - tissue tape
  • Washi Tape
  • Sizzix Tim Holtz  Alterations Block Talk
  • 7Gypsies Postale Alphabet Stickers
  • Plus Decorative Roller Stamp - Filmstrip
  • Die-Versions Wee Petites - Super Stars
  • Faber-Castell Design Memory Craft® Stamper's Big Brush Artist Pens - Black #199
  • Faber-Castell Design Memory Craft® Essential PITT Artist Pens BLACK SX
  • Faber-Castell PITT Soft Chisel Pen
  • Cosmo Cricket - Gold Glitter Paper
  • We Are Memory Keepers - Cinch Square Holes


Tuesday, June 17, 2014

Rosebud tutorial - by Tonya Gibbs

I just love making my own flowers. It is something I've been doing for years.  It feels amazing to showcase a beautiful piece of art and be able to say "and I made the flowers".  For me this just makes the piece a true masterpiece.  


A few weeks ago I had a request for a rosebud tutorial. So today, I want to share with you how I created these rosebuds that I used on the Marion Smith Designs and Glue Dots® blog hop last week. 


STEP 1:
For my Rosebuds I used Marion's Large Rose Die.  For a smaller bud, you may want to try Marion's small Rosebud die.  For the paper I used paper from a cheap Sketch Pad.   I colored the paper with Tattered Angels Sunshine before die-cutting the flower petals.


STEP 2:
To create a rosebud you need the 1" Glue Dot, 1 of each petal shape on the die, some floral tape, and a wire as long as you want your stems to be.   


STEP 3:
Cut your glue dot in half


STEP 4:
Overlap your petals slightly with the larger petal on the left, and apply your half Glue Dot  to the base. These glue dots are super strong and very sticky.


STEP 5: 
Place about 1/2 inch of your wire in the middle of the glue dot. 


STEP 6:
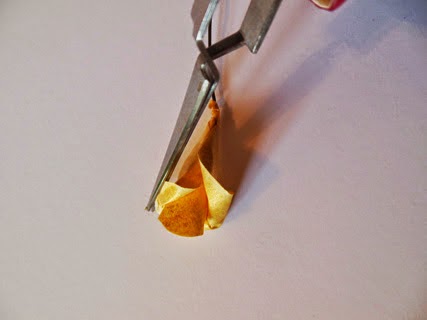
Begin rolling  your petal from the Right to the left into a cone shape.


This is how your rosebud will look. 


STEP 7:
Use some tweezers or a toothpick to roll down the outer petals to form your rose shape.


STEP 8: 
Spritz your floral tape with water to activate the glue on the tape.  


STEP 9:
Begin wrapping your tape around the base of your flower concealing the base of the rosebud, and the wire.  Continue to twist the tape down the wire. 


Your final rosebud should look like this. 


Look at how gorgeous these buds look wrapped in this floral spray.


I hope you have fun making these rosebuds. If you do, please share your projects with us in social media by using the #MarionSmithDesigns  #BloomImpressionDies


Thanks for stopping in today.
Tonya Gibbs
http://www.psychomoms.com


Wednesday, May 28, 2014

Nirvana Mini Album by Tonya Gibbs


WOW this mini is jammed tight with lots of Marion Smith Design Products, and tons of techniques.  Yep - I'm still on a gold kick and wait until you see how these gold accents really bring this album to life.  I used the Nirvana Collection, scraps from several digital kits, Junque & Gems, all of  Marion's stamps, Marion's Dies, Bloom Impression Tool and some of the resin pieces on this mini.


Over the last few months, I've shared several tutorials that have led to the making of this mini.
Last week  I shared a tutorial on creating flowers with Marion's new Bloom Impression Tool.  This flower uses the Bloom Tool & Marion's Large Rose Petal Die, and Leaves & Stamens Die.  


A few weeks ago,  I shared how I made a Garden Mother's Day card, and used that same technique to create the section hinges.  and the pockets on the inside cover.

Here are a few of my favorite spreads


In January I shared with you  Wooden Ticket tutorial. I think these little tickets look awesome with your embellishment clusters.


Here is a complete walk through video of this little mini so you can see each page!


If you missed those other posts, I hope you  get to take a peek soon.

Thanks for stopping in today
Tonya Gibbs
http://www.psychomoms.com

Thursday, May 8, 2014

Full of Wonder Mixed Media Layout by Tonya Gibbs


Hi everyone, I hope you're having an awesome week so far.  Today I'm sharing a mixed media layout of my niece Emily. I recently took this photo at Easter and the expression on her face is so precious. She's just oozing with sweetness.   I thought that the tag on the right from Marion's Mad Tea Party Collection said it all "Wonder, For the Curious At Heart the Wanderous Mind, and the Adventurous Soul"


I decided on Marion's Motley Collection  & Junque & Gems, because there are so many elements that can be fussy cut from this collection. The festive color palette was perfect for my sweet Emily! 


I used scraps from recent projects, and took this opportunity to fussy cut the elements that could be used as stand alone pieces  then cut banners from the rest. This is a great way to eliminate scraps.  Individually these small elements seem insignificant, but when clustered together, they really make a statement.


I used a neutral baby blue paper for the background, and then applied a few mixed media techniques to give it texture and depth.   I stuck with the hot pink tones so that my photo would really pop.  


I'm seriously in LOVE with Gold right now, and decided to spray paint some generic paper doilies with Krylon's Metalic Gold Spray Paint.  I love how they look inside my embellishment clusters, and the gold matches this collection perfectly! 


I placed my title in the bottom left hand corner inside another embellishment cluster. Her eyes were so bright in the photo I decided to include that reference in my title   "Blue Eyes Full of Wonder".  The title card was part of Mairon's Scarlet Digital collection.   

We would love to see what you have created with Marion's gorgeous lines. Don't forget to #MarionSmithDesigns when you share your Marion Smith Designs Projects in Social Media.  

Thanks for stopping in today. 

Tonya Gibbs
http://www.psychomoms.com 


DESIGN TEAM CALL REMINDER:   - deadline for submissions is May 30, 2014. Here is the link with all the details!


Sunday, April 27, 2014

Garden Mother's Day Card - by Tonya Gibbs


Hi everyone, I hope you're having a great weekend.  Mother's Day is in a few weeks, and I thought it would be fun to inspire you with a Mixed Media  Mother's Day card tutorial using Marion's new Bloom Impression Dies and her amazing Curiosity, Texture, and Garden Rose Stamp sets.    


I coffee stained some card stock, then folded it in half. I wanted my card to have a shape to it, so I used my Grand Calibur  and placed the fold just inside the edge of the die so that it wouldn't cut along the spine of the card. 


Now the fun can begin.   I folded down the flap because I plan to create a pocket card.  Then using Marion's new Texture fade stamps  I used heat embossed the design with Queen's Gold Embossing Powder by Ranger.    I love the texture that was left behind and the card is starting to look RICH!


Now for a little more texture.  I used Gesso and texture with the lines found on this Crafter's Workshop "Well Rounded" 6x6 Stencil. 


I still felt that the card was a bit naked in the bottom, so I used Marion's Curiosity Stamp and the Queen's Gold embossing powder to add the giant rose at the bottom of the card.  


Now for  a Splash of color.  I used water color paints to paint the rose.  I love how the Gold foiled outline pops against the vibrant watercolor.  Also note that the embossing helped keep the watercolors from fading. 


A little more texture was needed at the top of the card.  So I reached for my Archival Ink and Mairon's newest Stamp "Garden Rose"  to apply the Chicken Wire design on the flap. 


I then stamped the bee from the same stamp set directly onto the card.  He looked a bit flat.  So I stamped him again onto a piece of scrap.  And used a Versa Ink Pen in the negative areas and the Queen's Gold embossing powder to give him a bit of shine.  I also only glued him down int he center so that his wings were elevated.  (He symbolizes - my Mom being the "Queen Bee"  (HAA - SHHHH don't tell her!).   I used the same Versa Pen to trace the edges of the card and gilded them with the Queen's Gold powder as well.  I love the fact that the powder was not uniformly applied. It gives the card a nice grungy feel.  


Now for the top of the card.    I wanted to create a dimensional spray at the top using Marion's Bloom Impression Dies.   Last post I shared with you how to make the flower.    The only thing I did different was spray the flower Tutti Fruity Glimmer Mist so that it matches my water colored flower.   I also used the same Gold powder on Marion's Junque and Gems Filigree flower and added a gold button from my stash for the center. 


With all this gold I wanted the leaves to really pop,  so I used drawing paper to cut them out, and sprayed them with Tattered Angels Grass Plain Jane Baseboard Spray and the Mantis Chalkboard Spray (These are my go to leaf colors LOVE THEM!  The Mantis has a nice Gold shimmer which nicely complimented by Gold Embossing.   All that was left was to use the Versa pen to apply gold embossing powder to the tips of the leaves.   


The tag topper was finished off with a Jute bow. 


The Sentiment was added across the flap, and finished off this card.  I have plenty of room on the tag to write a message.    I love the overall finished look of this card.  


My Mother loves to garden, so I know she is really going to cherish this card.  If you have these dies and stamps, please make sure you share photos of your projects with us on Instagram and Facebook.  Don't forget to use the   #MarionSmithDesigns  so that we can find your creations easily. 

Thanks for stopping in today.  I hope you have a creative week! 


Tonya Gibbs
http://www.psychomoms.com

Reference:   Here is the link to the Post where I made the flower...
http://www.marionsmithdesigns.blogspot.com/2014/04/shabby-fabric-flower-tutorial-by-tonya.html