I just love making my own flowers. It is something I've been doing for years. It feels amazing to showcase a beautiful piece of art and be able to say "and I made the flowers". For me this just makes the piece a true masterpiece.
A few weeks ago I had a request for a rosebud tutorial. So today, I want to share with you how I created these rosebuds that I used on the Marion Smith Designs and Glue Dots® blog hop last week.
STEP 1:
For my Rosebuds I used Marion's Large Rose Die. For a smaller bud, you may want to try Marion's small Rosebud die. For the paper I used paper from a cheap Sketch Pad. I colored the paper with Tattered Angels Sunshine before die-cutting the flower petals.
For my Rosebuds I used Marion's Large Rose Die. For a smaller bud, you may want to try Marion's small Rosebud die. For the paper I used paper from a cheap Sketch Pad. I colored the paper with Tattered Angels Sunshine before die-cutting the flower petals.
STEP 2:
To create a rosebud you need the 1" Glue Dot, 1 of each petal shape on the die, some floral tape, and a wire as long as you want your stems to be.
STEP 3:
Cut your glue dot in half
STEP 4:
Overlap your petals slightly with the larger petal on the left, and apply your half Glue Dot to the base. These glue dots are super strong and very sticky.
STEP 5:
Place about 1/2 inch of your wire in the middle of the glue dot.
STEP 6:
Begin rolling your petal from the Right to the left into a cone shape.
This is how your rosebud will look.
STEP 7:
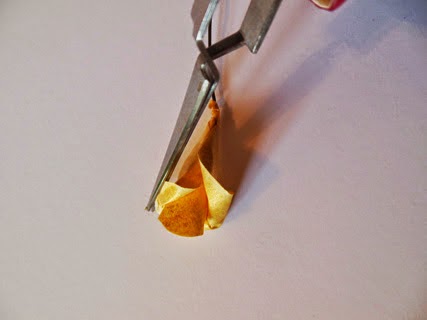
Use some tweezers or a toothpick to roll down the outer petals to form your rose shape.
STEP 8:
Spritz your floral tape with water to activate the glue on the tape.
STEP 9:
Begin wrapping your tape around the base of your flower concealing the base of the rosebud, and the wire. Continue to twist the tape down the wire.
Your final rosebud should look like this.
Look at how gorgeous these buds look wrapped in this floral spray.
Thanks for stopping in today.
Tonya Gibbs
http://www.psychomoms.com


Wow! Thanks to sharing - love the final piece too :o)
ReplyDeletevery cute, I shall start doing my own flowers too, when my bloom tool comes in :D
ReplyDeleteWow, Tonya, this rose bud is quite possibly the sweetest little rose bud I have ever seen. Thank you fro sharing your talent!
ReplyDeletewhat an awesome tute!! nothing beats gorgeous hand made flowers :)
ReplyDeleteA very sweet rose bud! Thanks for the tutorial!
ReplyDelete