Showing posts with label Roses. Show all posts

Friday, November 28, 2014

Handmade flowers with MSD Bloom Impressions Tool

Hi everyone and happy Friday,
hopefully my American friends had a nice Thanksgiving :)

Todays post will be a little different from my previous for MSD.
Christmas is just around the corner 
and I bet most of you have already  
started preparing Christmas in one way or another.

I'm definitely one of those people at least :)
That's why I wanted to bring you something 
totally not-Christmasy for as an inspiration.

Here it comes:


I''ve also prepared a color palette for you:


I used the MSD Bloom Impressions Tool for this project:


and other supplies:

50 100097

50 100100

50 101051 50 101068 50 101063

And now I have an announcement:

Thank you ladies for playing along.

And the WINNER of my last challenge is:


Samra!!!

I'm so happy for you my friend :)
Pop me an e-mail aneta@artisant.is
with all your shipping informations.

Have a nice weekend everybody and please visit me soon!
xoxo
Aneta 

Friday, October 10, 2014

Spooky Halloween

Hi everybody, 

Halloween is just around the corner 
and my newest project is Halloween related....
... and of course with a hint of shabby:


I've prepared a color palette for you :


Supplies:

50 101007

50 101009


50 101038     50 101058

50 100800

and also some PTI dies and a Melissa Frances Shabby Frame.

And just a quick remind about my current challenge:

CURRENT CHALLENGE

where you can win MSD prize :)


I'd love to hear from you my friends :)
Thank you for stopping by today!
xoxo
Aneta

Tuesday, June 17, 2014

Rosebud tutorial - by Tonya Gibbs

I just love making my own flowers. It is something I've been doing for years.  It feels amazing to showcase a beautiful piece of art and be able to say "and I made the flowers".  For me this just makes the piece a true masterpiece.  


A few weeks ago I had a request for a rosebud tutorial. So today, I want to share with you how I created these rosebuds that I used on the Marion Smith Designs and Glue Dots® blog hop last week. 


STEP 1:
For my Rosebuds I used Marion's Large Rose Die.  For a smaller bud, you may want to try Marion's small Rosebud die.  For the paper I used paper from a cheap Sketch Pad.   I colored the paper with Tattered Angels Sunshine before die-cutting the flower petals.


STEP 2:
To create a rosebud you need the 1" Glue Dot, 1 of each petal shape on the die, some floral tape, and a wire as long as you want your stems to be.   


STEP 3:
Cut your glue dot in half


STEP 4:
Overlap your petals slightly with the larger petal on the left, and apply your half Glue Dot  to the base. These glue dots are super strong and very sticky.


STEP 5: 
Place about 1/2 inch of your wire in the middle of the glue dot. 


STEP 6:
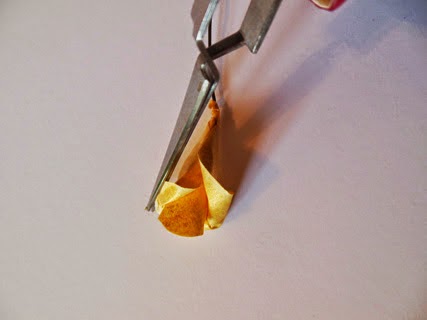
Begin rolling  your petal from the Right to the left into a cone shape.


This is how your rosebud will look. 


STEP 7:
Use some tweezers or a toothpick to roll down the outer petals to form your rose shape.


STEP 8: 
Spritz your floral tape with water to activate the glue on the tape.  


STEP 9:
Begin wrapping your tape around the base of your flower concealing the base of the rosebud, and the wire.  Continue to twist the tape down the wire. 


Your final rosebud should look like this. 


Look at how gorgeous these buds look wrapped in this floral spray.


I hope you have fun making these rosebuds. If you do, please share your projects with us in social media by using the #MarionSmithDesigns  #BloomImpressionDies


Thanks for stopping in today.
Tonya Gibbs
http://www.psychomoms.com


Thursday, June 12, 2014

Good Luck

Hello everybody,

Today I bring you a happy, light card in spring colors.

I'm in love with this balloon stamp from this set:

50 101002


Supplies:

50 100500  50 101004

50 100100 50 100600

and 

50 101025 50 101030

Thank you for visiting me today and for all your sweet comments!
xoxo
Aneta 
Monday, June 2, 2014

Vintage Beauty

Hello dear friends!  

I would love to share with you the result of yesterday's scrapbooking night.
My card is full of flowers and with lots of layers and tiny details.
Perfect for birthday!
 Here it is:


Supplies:

50 101022

GARMENT DISTRICT 
Marion Smith Design 6x6 Scrapbooking Paper Pack

Thank you for visiting us today and I wish you crafty week everybody!
xoxo
Aneta

Thursday, May 8, 2014

Full of Wonder Mixed Media Layout by Tonya Gibbs


Hi everyone, I hope you're having an awesome week so far.  Today I'm sharing a mixed media layout of my niece Emily. I recently took this photo at Easter and the expression on her face is so precious. She's just oozing with sweetness.   I thought that the tag on the right from Marion's Mad Tea Party Collection said it all "Wonder, For the Curious At Heart the Wanderous Mind, and the Adventurous Soul"


I decided on Marion's Motley Collection  & Junque & Gems, because there are so many elements that can be fussy cut from this collection. The festive color palette was perfect for my sweet Emily! 


I used scraps from recent projects, and took this opportunity to fussy cut the elements that could be used as stand alone pieces  then cut banners from the rest. This is a great way to eliminate scraps.  Individually these small elements seem insignificant, but when clustered together, they really make a statement.


I used a neutral baby blue paper for the background, and then applied a few mixed media techniques to give it texture and depth.   I stuck with the hot pink tones so that my photo would really pop.  


I'm seriously in LOVE with Gold right now, and decided to spray paint some generic paper doilies with Krylon's Metalic Gold Spray Paint.  I love how they look inside my embellishment clusters, and the gold matches this collection perfectly! 


I placed my title in the bottom left hand corner inside another embellishment cluster. Her eyes were so bright in the photo I decided to include that reference in my title   "Blue Eyes Full of Wonder".  The title card was part of Mairon's Scarlet Digital collection.   

We would love to see what you have created with Marion's gorgeous lines. Don't forget to #MarionSmithDesigns when you share your Marion Smith Designs Projects in Social Media.  

Thanks for stopping in today. 

Tonya Gibbs
http://www.psychomoms.com 


DESIGN TEAM CALL REMINDER:   - deadline for submissions is May 30, 2014. Here is the link with all the details!