Showing posts with label Canvas. Show all posts

Thursday, September 25, 2014

Mixed Media Canvas with Jelissa

Hi there friends!

Today I'm up on the Marion Smith Designs blog today with a mixed media canvas I created using MSD stamps, Garment District papers and also Junque and Gems embellishments.

Here's the canvas:


My background was created with a lovely blend of water colors, mist and glazes. And I've combined two different small stamp modules from the Curios Stamp set and used them as a repeating motif in my background.

And some close-ups:


A fussy-cut doll from Mad Tea Party


Junque and Gems goodies. I've also dabbed some liquid pearls to accent my stamped images.


A lovely flower from Curios stamp set which is the centre piece of the canvas. Had so much fun layering the colors!

And here's the start to finish video of how I put this canvas together:


And that's all I have for today, thanks for dropping by!

MSD products used:


love,

Tuesday, June 17, 2014

Rosebud tutorial - by Tonya Gibbs

I just love making my own flowers. It is something I've been doing for years.  It feels amazing to showcase a beautiful piece of art and be able to say "and I made the flowers".  For me this just makes the piece a true masterpiece.  


A few weeks ago I had a request for a rosebud tutorial. So today, I want to share with you how I created these rosebuds that I used on the Marion Smith Designs and Glue Dots® blog hop last week. 


STEP 1:
For my Rosebuds I used Marion's Large Rose Die.  For a smaller bud, you may want to try Marion's small Rosebud die.  For the paper I used paper from a cheap Sketch Pad.   I colored the paper with Tattered Angels Sunshine before die-cutting the flower petals.


STEP 2:
To create a rosebud you need the 1" Glue Dot, 1 of each petal shape on the die, some floral tape, and a wire as long as you want your stems to be.   


STEP 3:
Cut your glue dot in half


STEP 4:
Overlap your petals slightly with the larger petal on the left, and apply your half Glue Dot  to the base. These glue dots are super strong and very sticky.


STEP 5: 
Place about 1/2 inch of your wire in the middle of the glue dot. 


STEP 6:
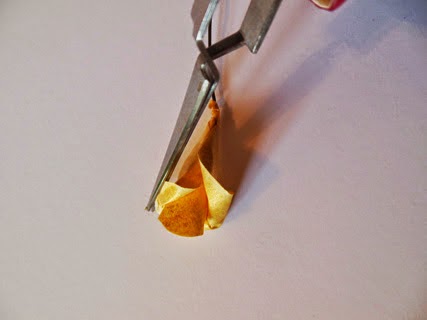
Begin rolling  your petal from the Right to the left into a cone shape.


This is how your rosebud will look. 


STEP 7:
Use some tweezers or a toothpick to roll down the outer petals to form your rose shape.


STEP 8: 
Spritz your floral tape with water to activate the glue on the tape.  


STEP 9:
Begin wrapping your tape around the base of your flower concealing the base of the rosebud, and the wire.  Continue to twist the tape down the wire. 


Your final rosebud should look like this. 


Look at how gorgeous these buds look wrapped in this floral spray.


I hope you have fun making these rosebuds. If you do, please share your projects with us in social media by using the #MarionSmithDesigns  #BloomImpressionDies


Thanks for stopping in today.
Tonya Gibbs
http://www.psychomoms.com


Tuesday, December 24, 2013

Let it snow...

Hello my dear friends
and happy Christmas Eve everybody!

It's Aneta here and I'm so honored to post this special post on this special day.
I made something special for today.

I think you agree, there is nothing more beautiful then 
when it's snowing outside and people gathering around the Christmas table
 enjoying a perfect Christmas dinner.

That was the image I had in mind making this canvas.


I used:


and a lot of gesso for a more Christmassy look.

At the end I just want to wish you 

The Blessings of Peace
The Beauty of Hope
The Spirit of Love
The Comfort of Faith
May these be your gifts this Christmas Season

xoxo
Aneta

Saturday, October 5, 2013

Nirvana Pumpkin Canvas by Tonya Gibbs

Hi everyone, today I wanted to share with you a 10x10 mixed media canvas that I created using Marion's Nirvana line.


I used the b-side of Up And Away to cut out my pumpkins and sunflowers. The paper had a Gothic feel with the typography and lace accent, making it perfect for a Halloween decor.
 
 
For the pumpkin I cut a simple pumpkin shape out 3 times and used an oval die to separate the sections of the pumpkin.  I used really thick fun foam as my pop up dots to keep them dimensional.   To color the pumpkin, I used Tim Holtz' Orange Marmalade Distress Stain, combined with the Metallic Bronze Distress paint.  Then  I used Vintage Photo Distress ink to darken the shadowed edges to accent the 3D curves. 
 
 
For the spray at the bottom,  I used scraps of Nirvana paper I had left over from the pumpkins to cut out the daisy shapes with the Tim Holtz Tattered Florals Die. For contrast against the pumpkin, I decided to leave them their natural color adding a small amount of vintage photo distress ink for depth.  For the daisy centers I used a clear rhinestone that I painted with my Copic E29. To finish it off, I added some metal pieces for sparkle, burlap for texture, and a few sprays of berries for depth.
 
I love that this canvas fits the Halloween / Harvest theme and can hang in my home during the entire fall season.
 
Thanks for stopping in today,
 
Tonya Gibbs
 

Tuesday, September 17, 2013

Mixed Media Canvas - Tonya Gibbs

Hi everyone, today I want to share a piece of art that I created to inspire a group of friends.  For those who have followed me for a while know that I'm in Weight Watchers.  Last week we had an awesome meeting where we shared our  group's success stories.  The three who shared lost a combined weight of over 160lbs.  WOW!  That in itself is encouraging to me!  We discussed the power in believing in yourself.  I was inspired in that meeting to create a canvas that I gave away at our meeting last Monday night.


Showcased at the bottom of the frame is Marion's Rolled Roses.  I love how the black in the roses pulls in the black from the chalkboard.  I also used scraps from her other digital journal lines to create the butterflies.  The butterflies were then dipped into melted UTEE to give them a glass like texture.


I wanted the frame to have a weathered inconsistent look.  The frame is one of the ornate wood frames with an inside opening of 5x7.  I painted a base coat with bronze distress paint, then crackled small portions.  I used an  Off-White linen acrylic paint to white wash over the top.  Once it was dry, I then sanded some areas to further disstress the wood. I used an Unity Stamp that says "If You Can Imagine It, You Can Achieve It!"  repeated all over the top  of the frame's surface.   I like that you are unable to see it printed clearly anywhere.  This makes you really focus on the words, and not just the quote.


For the background, I chose the Mad Tea Party paper "Roses 'R' Red".   I loved the repeated rose and clock patterns.  So I ripped it into irregular pieces, and combined it with some vintage recipes from a low-calorie cookbook.  I then covered it in gesso and recolored it with pink and gold gelatos.   A TCW damask stencil and molding paste were then added and the entire piece was colored again with gesso, gelatos, and finished off  with the bronze distress paint.  When you look at this canvas, the background stays in the background, but a closer look reveals the subtle hints of the patterned below the layers of paint!
 
 
For the quote, I used a saying from another Unity Stamp "Trust in your potential, enjoy the process, try something new, explore possibilities, but most of all BELIEVE!"   The stamp was ATC size, so I had to hand write it on the 5x7 cardstock.  Hidden inside the spray at the bottom, I have a clock - to remind you to take time for yourself.  A token that says "courage"  so you remember to have the courage to change your habits. And one that says "Believe" To reinforce belief in yourself!  

To me - this piece looks like a Tuscan kitchen.   The strong terracotta colors, combined with the rich roses and the chalkboard draw me in, and take me to another place. 


Thanks for stopping in today,

Tonya Gibbs
http://www.psychomomscrapbooks.blogspot.com

Resources:

Marion Smith Designs  Roses R Red, Rolled Roses
Faber Castle Design Memory Craft:   Gelatos - Pink, Hot Pink, Gold
Liquitex -  Gesso & Surface Prep Matt Medium
Ashley Home Decor - Vine
Martha Stewart Crafts - Butterfly Punch
Ranger - Utee, Distress Paint in Bronze. Coffee & Jet Black Archival Ink
Idea-ology - Tokens
Gely Roll - White Gel Pen
Cardstock
Cookbook
Doily
Prima - Clock
Unity -  Stamps

Tuesday, September 10, 2013

Step by Step

Hi everyone,

A few days ago I saw a brilliant tutorial 
on how to use leftover chipboards.
I instantly got inspired by these ideas.


Step 1: Choose the leftover chipboards you want to use for your project 


Step 2: Choose some papers. I used some MSD scraps and leftovers from an old book


Step 3 & 4:  Prepare your supplies 


Step 5: Glue the scraps and the old book sides on the canvas.
I glued the old book sides all around my canvas for a more shabby look.


Step 6: Position your chipboard leftovers on your project and glue it well
to the surface 


Step 7: Put a layer of gesso on your project. Not too much though.


Step 8: I used some glitter mist to give it a more shabby look.
You can skip it if you don't feel like it :)


Step 9: The final touch. Organize your embellishments on your project.
I used a little bit of Distress Ink on the sentiment.

And voila :


It makes a beautiful decor for my atelier :)


Thank you for visiting and have a creative week!
Aneta