Wednesday, February 26, 2014

For a Little Lady

Hi everybody, 
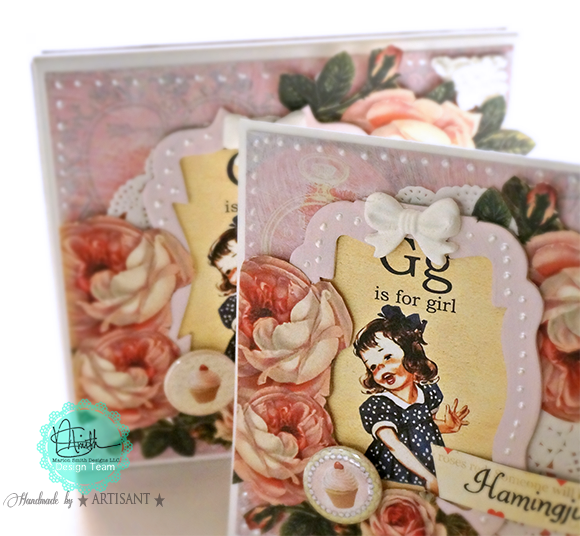
My today's project is very girly because 
of my niece's birthday which is coming soon.

She is like a little princess and she loves everything that's girly.

I made this set for her, a box and a matching card.
I hope she will use this box to keep some of her treasures.


For this project I used:


  I used this as background and of course a lot of gesso.
I cut out roses from these sheets:


and the girl I used came from this one:


Now I just can't wait to see if she'll like it.
Thank you for stopping by and please visit us often :)
xoxo
Aneta 

Tuesday, February 25, 2014

"On This Day" Card using Garment District Collection

Hi everyone!!
It's me Peggy Lee here,
to share with you another mixed media card.
"On This Day"
could be used for a wedding or thinking of you card.
"French Line"
"Blush"
"Picture Perfect"
"Fitting Room"
"Remnants"
Distressed the edges along with brushing on gesso here and there on all the edges.
Using gesso/stucco mixture with a Damask Stencil added some amazing texture.
Sprayed some of my favorite glimmer mists & mists.
Started layering the paper embellishments, added some lace and a Prima flower.
Thanks for stopping by today,
hugs
Peggy Lee

Supplies:
Marion Smith: Garment District Collection
Tea Party Stamps
Tattered Angels: Glimmer mist in 
Tutti Fruitti, English Ivy, Graphite, Tattered Leather & Turqouise Blue
Ranger: Perfect Pearls Mists in Blue Patina
and Distress Ink in Brushed Corduroy
Prima: Champaagne Rose
Gesso/Stucco
Damask Stencil


Thursday, February 20, 2014

Matchbook Coupon Book

Hello Friends!  Thank You for stopping by today to visit!   I hope you are having a wonderful February!  I am busy creating every day and I am making so many projects with the "Garment District" collection!  This is my favorite collection of all because I love sewing, and vintage girly things!  It has the most beautiful elements!!
Today I am sharing a little Matchbook Coupon Booklet.   I wanted to make a gift, one that is quick and easy!  Sometimes, you need a unique gift and I love the idea of coupons.

This is a little Matchbook card measuring 3.5 wide by 5.5 tall.   I made a little skinny pocket at the bottom for the top flap to tuck into!  

Here it is opened up! I lined the inside with antique book paper and I also love the Washi tape in Marion's line to add accent.

The Journaling cards in the collection paired with some Kraft tags make the "Coupons" a quick and easy gift to put together.  I decorated them with little elements, and tied seam binding to the tops! 
 These are the papers from the collection I used, along with some mint card stock to make the card base.


Supplies:
Enjoy Ticket Stamp: Heidi Swapp
Mint Cardstock: Bazzill
Seam Binding: Snug Hug
Buttons and Ribbon: My stash
Book Paper: My stash

Happy Crafting!!!  
Come back and visit us often!! 
Colette Nederhoff

Wednesday, February 19, 2014

New envelope tag box tutorial!

I hope you enjoy this little tutorial, you can find the printables here!


xoxo

Tuesday, February 18, 2014

Spring Shadowbox - by Tonya Gibbs


Hi everyone, I hope your week is off to a great start. With the weather so frigid everywhere, I wanted to create something that reminded me of spring.  I dug through some old photos and found this 5x7 of my niece Averie, and a 9x9 Shadowbox that I've been hoarding. 


It all started with a mixed media tag. I bought some of the Faber Castell Design Memory Craft glaze and wanted to experiment with it.  I love to experiment on tags, and then I try to make something with the tag.   On this tag, I used modeling paste and a stencil to get the hexagons.  Then painted the entire card with a soft green paint. Then I mixed the glaze with a gold colored acrylic, wiped it across the entire tag. Waited a few minutes then used a baby wipe to clean it off. The glaze actually stayed in the recessed areas, and helped to provide shadows on my tag.    I then started playing with some of the left overs from other Marion Smith projects, and used Marion's Hot Air Balloon stamp to create a pattern for the balloon on the tag.  The little girl and the saying were cut from the Mad Tea Party collection. 


Since the saying talks about seeds that grow I decided to build a little garden scene for my little girl to stand.   I used a vine as my base, then made a few flowers to cover the vine.

I removed the glass from the shadow box, and built my floral spray to spill out over the frame's edge.  I stitched together some punched scraps from Marion's Mad Tea Party line to create the banner that I placed across the top of the frame.


I just love how this frame turned out, and it is going to look fabulous on my wall. 

Thanks for stopping in today,

Tonya Gibbs


Saturday, February 15, 2014

Remnants of Spring Card using Garment District

With the snow storm we just had the past couple of days here
 on the East Coast-it has left me
dreaming of spring!!
Today I bring you this beautiful card using Garment District Collection and Junque Gems!
"Remnants of Spring"
Started with a white card base 6 1/2 x 5.
I used three of the Garment District Collection:
"Blush, Remnants and He Said"
What is awesome about Marion's paper collections is that you can cut the vintage images out!
With layering them together with distressing the edges-off setting them to give depth.
I really love fussy cutting out the images to create my own embellishments.
Like the tiny butterfly!!
Who doesn't love a little bling on their projects...
are perfect for that!! 
I love the metal flower with the resin cream flower.
Oh boy I can not wait for spring to come, longer and warmer days.
Birds and plants coming live....nest with eggs...
Why wait, create your own spring with lovely cards to share!!

Thanks for stopping in today, 
I would love to know what you love about spring and what's you favorite
new product from Marion Smith?...leave us a comment!

hugs,
Peggy Lee

Supplies:
Garment District
and


Thursday, February 13, 2014

Fly away with me

Hi everybody, here is my next inspiration for MSD.
Today I want to share with you a shabby Valentine´s card.
As you can see I didn't use any red in my project but I think
it's still very romantic.


It´s actually very easy to make.
I used this paper as background:


Then I stamped the edges and the balloon using this set:


For the 3D effect in the balloon I used two shades of green.
I cut out the middle of the lighter balloon and glued it on the darker.

I think this card could also be a perfect wedding card.
What do you think?

Thank you for visiting today and Happy Valentine's Day!
xoxo

Monday, February 10, 2014

Love Is All You Need

Hello there, Sarah reporting here! I have been busy playing with Valentine's Day cards, and I have one to share with you today! I have loved the color combo of pink & gray since I was little, so I really love the Garment District line! There are some really pretty gray elements that have pretty pink accents so those are the colors I used ;) I think it turned out pretty sharp with the contrast of the white!

 
I really love these colors especially because they're not traditional Valentines colors! Spice things up a little...

 
I used some of the Junque & Gems along with a few other tidbits I had on my desk!

 
I adore this little love snippet from the Mad Tea Party line! Cutest vintage font!


I hope I inspired you to create some Valentines! Or even just a card to let someone know you love them and are thinking about them ;) Thanks for hangin out today and have a beautiful day!
 
Love, Sarah

Sunday, February 9, 2014

Valentine's Tea, Anyone???

Hello Friends!!  I hope you are getting excited about celebrating LOVE in a few days!!  Valentine's day is one of my favorites, which you may have read in one of my posts here a couple weeks ago!  It's because I AM a Valentine!  (that's my maiden name)!!  I love celebrating and I thought it would be fun to have a Valentine's Tea Party!  I knew the perfect collection to make my invitations would be "Mad Tea Party".
Your invitation to TEA

Isn't that silverware perfect?? 

Here's the hidden tag with the invite!

This video shows my process!! 


Here are the supplies I used:

Hope your Valentine's day is full of LOVE and Blessings!
Happy Creating!
Colette  Valentine Nederhoff

Saturday, February 8, 2014

Embellishment Tutorial Part 2 by Tonya Gibbs

Hi everyone, I hope your weekend is off to a great start. A few weeks ago I shared with you a project on making wooden ticket embellishments that coordinate with your paper collections.  Today I want to share with you another idea for embellishing your projects.


Remember playing with Shrink plastic when you were kid?  I think I made charms in Vacation Bible School for 5 straight years (LOL).  Well here is a grown up project you can make using Marion's super awesome Curious Stamp Set.

I started with Poly Shrink Plastic by the Lucky Squirrel. You can use any brand just make sure it is clear if you want your roses to appear like glass. 


I used the rose & butterfly stamps from the from the Curios set. Stamp them using a permanent ink like Staz-on, or Archival Jet Black Ink from Ranger.


On the OPPOSITE side that you stamped, color the image with a permanent marker. Don't color on the side that you stamped or it will ruin your marker nib.  I used my Copic markers, but no need to worry about shading. The color becomes concentrated when they shrink, so the shading disappears.
 
 
Cut out your Shape.  Remove all negative space, but make sure you keep a thick border in the delicate stem area.   Here is what my Rose looks like when I cut it out. Notice that I colored outside the lines and made my stems a bit thicker.
 
 
Now grab a pair of tweezers, a heat source and start shrinking.  (The plastic will curl as it shrinks, but no worries, keep shrinking it will straighten out). 
 
 
The image shrinks to a 1/3 of the original size.  Once the image is cool enough to touch, I molded the leaves to give them some interest.


Use Glossy Accents or E6000 to adhere the charms to your projects. 
 
 
To show you how beautiful they are on a project,  I created this layout of my amazing parents using Marion's Garment District collection.  I love how tiny the butterflies turned out, and think the roses appear like glass and offer a nice touch of elegance to the layout.  


Here are the supplies from Marion's Garment District that were used to create this layout.


Thanks for stopping in today,
 
Tonya Gibbs