Monday, June 30, 2014

Mini Albums | Marion Smith Design Team Farewell

It's been a wonderful year with the very 1st Marion Smith Design Team.

We have formed a sisterhood like no other. These ladies have demonstrated their exceptional talents for an entire year and we are so proud and honored to have these ladies showcase the Marion Smith Brand! They have left big shoes to fill for the incoming group of designers. They will always be remembered as the first. 

Today we are sharing one of Marion Favorite projects: Mini-Albums! 

Click on the DT Members names to view details of the projects. 


Peggy Baker


Colette Nederhoff


Aneta Matuszewska


Thank you for stopping by. We will be back tomorrow with more.
Also our new design team will be announced this week. 


Angee Carter


Sunday, June 29, 2014

2013 - A Year In Review by Maggie Armstrong


 -Excerpt from Twilight-


And so my year on the Marion Smith Design Team concludes.  It has been my immeasurable pleasure and honour to be amongst those hand picked by Marion to showcase her inaugural collections.

Not only have I loved creating with her paper designs, but it’s been so exciting to see the development of her complimentary products such as the never ending gorgeous Junque Gems, the intricately designed stamps and of course the Bloom Impressions tool.

I am sure Marion will continue to forge her success in this industry,  supported by her fabulous, fit and equally talented husband Garett, and I know that I will continue to enjoy her collections, both past and present. 


So I’d like to leave you with a short video of the Marion Smith Designs projects I have enjoyed creating over the last 12 months.  Thanks to you all for your inspiring comments left on the blog and your own support of Marion’s products.  Xxx


Saturday, June 28, 2014

Time Flies when You are having FUN

Today marks my last post on this blog as a design team member!  I can't tell you what a fun blessing this has been to me and I have loved creating these inspirations using Marion's wonderful collections!  I will keep making things and enjoying these collections and embellishments, but the New Design team is on it's way to provide more new ideas and projects!  Thank You all for your support and for visiting this blog to see what we have made!
Today's project was inspired by another one of our team members, Sarah Bargo!  She had made one of these frames in a project I saw online, so I had to try one of my own!  For this project, I used the "Mad Tea Party" line and made a fantastic Large flower using the Bloom Impressions tool.  Marion has done a great tutorial on her tool and it is found on Youtube.  If you search on Youtube for Marion Smith Bloom Impressions Tool, you can learn how to make these gorgeous flowers with whatever paper you choose!


My daughter and her husband on their wedding day last August!  We are almost ready to celebrate a big Year anniversary! There's lots of lovely details on this project including the resin roses and the gorgeous pearl button and resin frame.  I got my clipboard stand at Hobby Lobby and sprayed it black to begin. I love making home decor with my photos.

The papers are so perfect for this theme! 

Here's the beautiful large flower I made.  I cut my petals from my Cricut and using the Bloom Impressions tool, I made gorgeous petals.  After you make the petals, I used a 2 inch glue dot to stick my petals in place and here is the finished product!  Fun and EASY!

Supplies:
Junque and Gems
Mad Tea Party Collection

Hope you are inspired to go make a clipboard frame!!  Thank YOU again to Marion and Garett and all the team members for being amazing to work with!  God bless you all the Thanks for this fun year of opportunity!!
Colette Nederhoff

Thursday, June 26, 2014

Farewell Post by Tonya Gibbs


Wow - I can't believe it has been a year already. Where has the time gone?  Honestly, I feel like I just started this creative journey.   I've enjoyed sharing with you guys each week, and I've made a lot of amazing friendships during this past year. My team mates are some of the world's most talented, and what an honor to serve next to them.  Marion is an amazing person, and I'm so happy that I can call her my friend!  Thank you for this awesome opportunity, and I look forward to future endeavors!

As my final project share, I thought I would create a masculine layout of my nephew and his first grade teacher.  I'm using pieces from Never Grow Up, Motley, Garment District and Nirvana in today's layout!


It is so fun to mix and match your collections to create the perfect project.   I love that all of Marion's lines coordinate so well! 


I have prepared a process video showing you how I made this layout!


It has been such an amazing year.  I've made some amazing friendship!  Thanks for all your comments, feedback, and love!  Let's stay in connected!  Follow the link to my blog and subscribe to all my social media outlets. 


Thanks for stopping in today, 

Tonya Gibbs

Resources for Today's Layout Share:
  • Marion Smith Designs: Nirvana - Documented
  • Marion Smith Designs:  Never Grow Up Never Never
  • Marion Smith Designs: Never Grow Up Treasure Map
  • Marion Smith Designs: Never Grow Up Wild & Free
  • Marion Smith Designs: Never Grow Up Sleep Over
  • Marion Smith Designs: Never Grow Up Self Portrait
  • Marion Smith Designs: Motley Anthology
  • Ranger Ink: Tim Holtz Distress Ink Refill Black Soot
  • Studio Calico:  Wood Veeners  Arrows, Speech Bubbles
  • Glitz Designs: Glitter Tape
  • Tim Holtz: Idea-O-logy - tissue tape
  • Washi Tape
  • Sizzix Tim Holtz  Alterations Block Talk
  • 7Gypsies Postale Alphabet Stickers
  • Plus Decorative Roller Stamp - Filmstrip
  • Die-Versions Wee Petites - Super Stars
  • Faber-Castell Design Memory Craft® Stamper's Big Brush Artist Pens - Black #199
  • Faber-Castell Design Memory Craft® Essential PITT Artist Pens BLACK SX
  • Faber-Castell PITT Soft Chisel Pen
  • Cosmo Cricket - Gold Glitter Paper
  • We Are Memory Keepers - Cinch Square Holes


Sunday, June 22, 2014

"Never Grow Up" Layout by Peggy Lee


Today I have the pleasure of sharing with you my last post as a Creative Team Member for Marion Smith Designs Blog for 2013 & 2014...my time has been such a creative adventure! I have been extremely blessed to work along side these amazing team members...and I want to thank to Marion for this chance to create with her fabulous and beautiful collections!
For my creative idea I decided to create a scrapbook layout using Never Grow Up paper collection by MSD and I knew I wanted to use this photo of my daughter's new shoes....
This photo reminds me that we are never to young to dream and play in life. And the title of this paper collection works perfectly for my title...cause every girl loves her shoes (dressing up feeling pretty) as well as playing/creating with paper...it always makes me feel young at heart!
This was a fun layout to create, adding textures and layers! I fussy cut out the beautiful roses
out of one of the paper collections...tucked them around the picture. 
What's really fun about Marion's paper collections is all the pieces and images you can fussy cut apart.
Which allows me to tuck little cut outs here and there, 
I also used Marion's Junque & Gems and Resins pieces.
Here is a close up of the beautiful roses I cut out...those shoes make me smile!

Memories of my past year on MSD Creative Team.
I also want to share with  you all some of my favorite creations,  I created for the MSD blog with
                             using MSD fabulous paper collections, stamps and embellishments
.
                                         Remnants of Spring Card, see more details here.

Not To Shabby Motley Layout & Tutorial, here.


                       Close up of the handmade flower using MSD Rose Petal Die & Leave Die!
                       And the fabulous Junque & Gems center rhinestone/pearl button....amazing!

                                  Here is a video on how I created this fabulous flower above!!
                                                                          Enjoy!


                          My Altered Wedding Cake using Garment District Collection 
                                                by MSD & Petaloo flowers!!
                                             You can see more about this here and here.


                                                          Thanks for stopping in today,
                                         hope you enjoyed all the inspiration I had to share!
                                                                           hugs,
                                                                        Peggy Lee
                                                           http://pegbaker.blogspot.com


Saturday, June 21, 2014

Life According to me...

Hello and thank you for stopping by!

One of my favourite things in the world is a cup of good tee with my best friend.

Because of that, picking a theme for this tag was really easy, 
especially when you can use a MAD TEA PARTY collection from MSD:


Supplies:

50 100300 50 100700
50 100600 50 100096

50 101024 50 101031

Have a great weekend everybody!
xoxo
Aneta

Wednesday, June 18, 2014

A Vintage Photo Project

Welcome to the Blog today friends!  I am sharing a Vintage Photo project today featuring the Nirvana Collection.  This collection really matched the theme of this project very well and I loved being able to use alot of the paper patterns.  There are so many beautiful elements in the collection, that I was so happy to use many of them and have it all coordinate.
The vintage pics really make this an awesome and fun wall hanging.  I got this frame from 7 Gypsies.  Each individual slot is it's own masterpiece and collectively, it makes a wonderful gift!
This photo frame shows off the Lovely papers in this collection!
This project is very easy to make because you just cut the papers to fit in each slot and then decorate each one.  
These photos are of my husband when he was a little boy!  I guess that makes us Vintage (haha!)  I loved using these pictures for this special project to hang.
I added some fun "Junque and Gems" to each slot and tied tags with Stamps from Marion's  Stamp collection also.

I love the vintage camera paper and I made an adorable blower embellishment with Marion's new Bloom Impressions tool!  
Supplies:
7 Gypsies frame (receipt holder)
Marion Smith "Junque and Gems and
Nirvana Collection of Papers


Thanks for stopping by to see this project!
Leave us some LOVE in your comments and see you again very soon!
Colette Nederhoff

Tuesday, June 17, 2014

Rosebud tutorial - by Tonya Gibbs

I just love making my own flowers. It is something I've been doing for years.  It feels amazing to showcase a beautiful piece of art and be able to say "and I made the flowers".  For me this just makes the piece a true masterpiece.  


A few weeks ago I had a request for a rosebud tutorial. So today, I want to share with you how I created these rosebuds that I used on the Marion Smith Designs and Glue Dots® blog hop last week. 


STEP 1:
For my Rosebuds I used Marion's Large Rose Die.  For a smaller bud, you may want to try Marion's small Rosebud die.  For the paper I used paper from a cheap Sketch Pad.   I colored the paper with Tattered Angels Sunshine before die-cutting the flower petals.


STEP 2:
To create a rosebud you need the 1" Glue Dot, 1 of each petal shape on the die, some floral tape, and a wire as long as you want your stems to be.   


STEP 3:
Cut your glue dot in half


STEP 4:
Overlap your petals slightly with the larger petal on the left, and apply your half Glue Dot  to the base. These glue dots are super strong and very sticky.


STEP 5: 
Place about 1/2 inch of your wire in the middle of the glue dot. 


STEP 6:
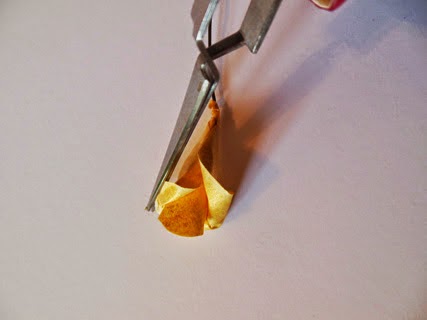
Begin rolling  your petal from the Right to the left into a cone shape.


This is how your rosebud will look. 


STEP 7:
Use some tweezers or a toothpick to roll down the outer petals to form your rose shape.


STEP 8: 
Spritz your floral tape with water to activate the glue on the tape.  


STEP 9:
Begin wrapping your tape around the base of your flower concealing the base of the rosebud, and the wire.  Continue to twist the tape down the wire. 


Your final rosebud should look like this. 


Look at how gorgeous these buds look wrapped in this floral spray.


I hope you have fun making these rosebuds. If you do, please share your projects with us in social media by using the #MarionSmithDesigns  #BloomImpressionDies


Thanks for stopping in today.
Tonya Gibbs
http://www.psychomoms.com