Showing posts with label Scarlet. Show all posts

Sunday, March 2, 2014

Hybrid Burlap Mini Album - by Tonya Gibbs

Hi everyone, I hope you are having an awesome weekend.  I made a little 6x6 burlap mini album in just a few hours, and thought I would share it with you today.  I used  Marion's Scarlet Digitals  along with some odd and end scraps from her Mad Tea Party and Nirvana printed lines.  I love how her printed lines and digi lines compliment each other perfectly! 


I added lots of yummy layers to the cover. A few months ago I shared a tutorial on how to make the flower, and I love how it coordinates with the roses in her papers.
 
 
For the inside I used one of Tim Holtz' binder mechanisms and 4x6 photo sleeves.


Pull out those punches and dies for projects like this.  They help to add a little interest to photo mats, and make great layering elements.


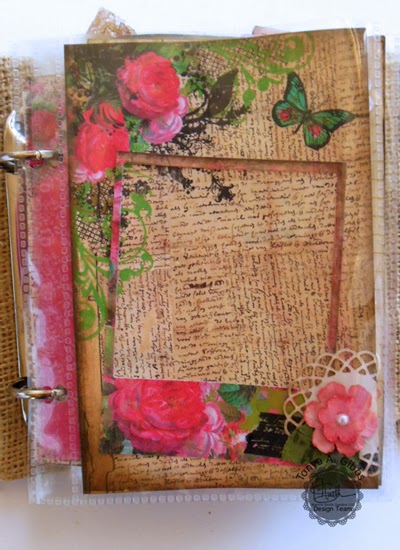
The journal pages are from some of Marion's Primrose printable. I fussy cut the rose and added it to the far right so it would match the rest of the papers.
 
 
I love how this file folder serves as a pocket on one of the pages.
 
 
Tags are a great way to add multi-level pages.  Tabs also offer interest sticking out of the margins.
 
 
I used some of the ATC sized note cards from her Nirvana collection to give an extra journal spot. 


The photo sleeves will offer protection for my photos, and give a nice clean finished look to the album.
 
 
This was a super fun project, and I just love it, when you can marry a bunch of itty bitty scraps, to create fabulous layers.   This little mini is going to make a gorgeous gift for one of my scrappy buddies. 
 
Thanks for stopping in today,
 
Tonya Gibbs

Sunday, November 24, 2013

Christmas Card designed by Tonya Gibbs

Hi everyone, I hope you're having a fantastic Sunday.  Today I would like to share with you a simple yet very elegant Christmas card I made with Marion's Designs. 
 
 
Merry Christmas Card Designs by Tonya A. Gibbs at Psychomoms.com  #card, #holiday, #Christmas, #marionsmithdesigns
 
 
I kept the design simple, so that the card could easily be duplicated and mailed. For the background, I decided to use white card stock that was dry embossed with a Cuttlebug Swiss Dot embossing folder.   This gave texture to the card, without a lot of fuss.
 
 
Then I trimmed a small piece from the B-side of the Mad Tea Party - Wonderland paper to make a banner. I love the softness of this paper and thought the mint was a nice "trendy" color for my card.   Since I only used a 2 inch strip, I can easily duplicate this card multiple times from one 12x12 sheet of paper.
 
 
Chalk boards are super trendy right now too, so I used the one from Marion's Scarlet Printable Collection for my sentiment. I can easily reprint the chalkboard as often as I need to since this piece is a digital file. This collection is currently on sale for half price in Marion's Store.   Click here for more details.  
 
Finally, I added a twine bow, and poinsettia to give the card a festive look. The rich red velvet hand made flower gave this card the WOW factor.
 
Here is a tutorial on how to create the Poinsettia.


I love that this card makes a wow statement without a lot of effort. Handmade cards are so special to me, because I know how much time and effort went into designing them.  Do you make your holiday cards?  If so, please share them with us on Facebook. Make sure you tag me in the post, so that I can admire your work.
 
Thank you for stopping in today,
 
Tonya Gibbs


Tuesday, October 15, 2013

Curious Stamp Coloring by Tonya Gibbs

Today, I would like to share with you a tutorial for coloring the rose from the Marion Smith Designs Curious Stamp Set. I used my rose on a A2 birthday easel card. 
 
 
Easel card using Marion Smith Designs Curious Stamp. Card designed by Tonya A. Gibbs  #psychomomscrapbooks #marionsmithdesigns
 
The rose from the Curious stamp set will be the focus of this post today.  I also used the large doily from the Tea Party set.  I stamped the doily image and cut it in half. Then tucked it under the lace at the top of the flower cluster on the inside of the card.


I have a limited selection of markers, so I had to work with what I have. I suggest that you experiment with your own color combos. Also, I'm not a copic coloring expert by any means! So please don't critique my coloring too much. Trust me, if I can do this, anyone can. Just takes a little practice.
 
 
To color the rose image, I used these Copic color combos....

Rose:    YR24, YR23, Y23, Y21
Leaves:    YG95, YG23, YG13
Sky:  BG10
 
 
I'm not doing a tutorial on coloring the entire rose, since I'm not an expert. Just offering a suggestion for stamping your image.
 
 
I started by coloring my stamp with my the darkest colors YR24 for the rose & YG95 for the leaves. Make sure you work fast before the colors have a chance to dry. 
 
 
Squirt blending solution on the stamp to moisten the stamp before stamping. (WARNING: The blending solution contains alcohol and is highly flammable. It should not be sprayed, or dried with a heat tool. ) The colored lines will lighten a bit when you use the blending solution, so I started out with my darker values.


Stamp the impression onto Copic Coloring paper. I used Neenah Solar White Classic Smooth paper. Allow the image to air dry completely before coloring - usually only a few minutes. WARNING: DO NOT HEAT SET THIS IMAGE - The Blending solution is flammable. As you can see above, the image is not completely clear and bleeding did occur from the blending solution.  No worries, since we stamped with the colors that we intend to use, we can correct these imperfections when coloring.


Color your rose one petal at a time. I started with my shadowed area of the petal, then filled in with a highlight adjacent to the shadowed area.  Change your color combos for your highlights and your shadows to give more contrast to your image. Reference a rose photo from the Internet to get a feel for what areas should be dark, and which areas should be highlights.
 
For your highlights use colors light - med (omitting the darkest color, YR24),  then for your shadowed areas use your darker - med. colors.  (omitting the lightest color, Y23).   Here is a quick color reference.

Shadow color combos: YR24, YR23, Y21
Highlight color combos: Y23, Y21, YR 23


Your lines will start to disappear as you begin moving across the rose, so be sure to work in small sections.    


Once the image was colored, I used a Spellbinder's bracket die to cut out my rose. For the card base, I used the damask from Marion's Scarlet collection. I also added a few butterflies and the frame from the Scarlet collection as well. I love how my flower looks perched on the easel when the card is open.
 
 
Easel card using Marion Smith Designs Curious Stamp. Card designed by Tonya A. Gibbs  #psychomomscrapbooks #marionsmithdesigns
 
I didn't get into too much detail about coloring since I'm learning myself.  However, I hope you consider these techniques when using the stamp with your own projects.  
 
Thanks for stopping in today,
 
Tonya A. Gibbs
 

Sunday, September 29, 2013

Love You - Kim Price


Today I would like to share a layout I created using some of the gorgeous printables available from Marion Smith Designs. I just adore the mini file folders and these were my starting point for this page. There are so many ways to use these - everything from mini albums to cards, mixed media projects to ATC's and of course scrapbooking layouts like the one I have created above. 

My page started out as a simple 12x12 chipboard sheet which I painted with gesso adding some subtle color using a combination of Distress Paints and inks. I've then added texture with stamps and stencils allowing the whole thing to dry completely before adding lots of gorgeous layers from the Scarlet collection along with other MSD printable elements - there are just so many amazing designs and they all work together beautifully! A title and some coordinating flowers are the perfect finishing touches.

Thanks for dropping by today, hope you find some inspiration. 


Products used:


Tuesday, September 24, 2013

It's Fall Y'all!

Hey there! It's Sarah here, and I wanted to share a Fall card with you! I am so excited that it is fall, it is one of my favorite seasons! The colors are just so beautiful, especially on the leaves. I wanted to create that same color effect, so I took some of the "Up & Away" paper from Marion Smith Design's new Nirvana collection, and a piece of an aged looking paper with text on it from the Scarlet printables collection. I die cut the papers into a large leaf and a small leaf and used water colors right on the die cut leaves to create the pretty fall colors!


Also, I printed out the Tattered Rolled Roses Spring Mix Printable flowers, and used some Walnut Distress Ink to grunge them up.


Add a grungy tag, burlap, and some brown glittery berries and you have yourself a beautiful fall card for someone special!

 
Thank you so much for stopping by and have an amazing day!
 
Love, Sarah


Saturday, September 14, 2013

Bubble Art Technique - Tonya Gibbs

Hi everyone, today I want to share a mixed media technique that I saw in the April 2013 issue of Martha Stewart Magazine.  In that issue they used paint to achieve this look, but I decided to use my Tattered Angels Mists instead. 


You will need a package of Children's Bubbles, a drinking straw, and your favorite mist colors - make sure you choose a bright color for great contrast.  Also (not shown) you will need a large container for your solution, and a drying mat. I lined a cookie sheet with paper towels.


Pour about a half an inch of bubble solution into a large bowl. Then using the drinking staw blow bubbles. Make sure you don't suck the solution up the staw, and supervise small children.


Then Spray your Tattered Angels sprays over the top of the bubbles. Make sure they are very saturated for even results.

 
Place your cardstock ontop of the bubbles, but do not allow it to touch the liquid below. 

 
Lift the cardstock and blot dry with a paper towl.  Repeat these steps until desired pattern is achieved.

 
I die cut mine with the Tim Holtz Tag and Tab die, and tied a piece of seam binding to the top.


The tag makes an interesting layer on this card.  This technique would also be super cool in mixed media canvases, on layouts, and the article used it on butcher paper as gift wrapping. 


We experimented with adding multiple colors and the results were super fab. Blue, Green, and Gold were my nephew Cooper's favorite combo.  He really enjoyed playing with these bubbles. 

Thanks for stopping in today,

Tonya Gibbs
http://www.psychomomscrapbooks.blogspot.com

Tuesday, September 3, 2013

A Charming Tutorial

Well hello there, happy happy Tuesday to you! Sarah Bargo reporting here and I have a fun tutorial for you today! We're going to turn these;

 
Into this!


It's not something new, but it's something I love to do! Have you ever tried making your own charms to wear? I always loved handmade artsy necklaces and bracelets with lots of blings and baubles, and I always wanted to try making them but was too intimidated by it. Now that I see how simple and fun it is, I am HOOKED!! Lets get started! There are 3 different variations we are going to do, all work perfect and easily!

The first thing you'll need to do is go over to Marion Smith Designs shop and grab some of her beautiful printables! You will need these for your images ;) I used the ephemera sheet from The Scarlet Collection, and 2 sheets from the awesome new Nirvana collection which will be available in stores soon!!  Fussy cut your favorite elements that you want to be the "theme" of your jewelry.

Here is a supply list for you;

Marion Smith Designs paper
Vintage book paper words (cut out individually)
Glossy Accents (or any other clear type quick drying glossy adhesive)
Tim Holtz Glass Facets
Tim Holtz Typewriter Charms with Epoxy Circles
Ranger Memory Frames & Memory Glass
Chain for Necklace/Bracelet
Jump Rings
Other miscellaneous pieces you want to add to your jewelry, blings, things of that nature


For the first type of charm, you will need your glossy adhesive, fussy cut pieces, some old book paper words, and a glass facet piece.

 
STEP 1; With the fussy cut paper pieces, glue them together using the glossy adhesive, creating a mini collage.

 
STEP 2; Drop some glossy adhesive on top of your collage, and spread it around using your finger!
 
 
STEP 3; Place the glass facet on top of that, pushing down so the pressure pushes out any air bubbles.  You should come out with something like this;
 
 
Good?! See, easy peasy!
 
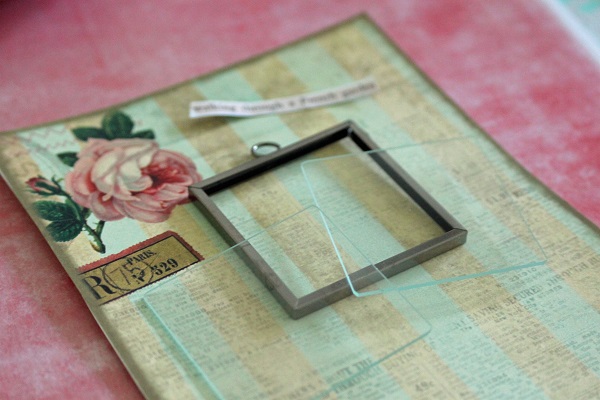
For the second charm. You will need; Marion Smith Designs printable paper, vintage book words, and a Ranger memory frame and 2 pieces of the memory glass.
 
 
STEP 1; Lay glass piece over element on paper that you want to use.
 
 
STEP 2; Cut out around glass piece so you get the perfect size, and glue down the words on top of your paper. (under glass piece lol!)
 
STEP 3; Sandwich paper between 2 glass pieces and carefully stuff into memory frame. There is a little metal piece on upper right corner of frame that you lift open and the whole frame bends open. Hint; If you use double sided paper, you'll get pretties on both sides in case the charm flips when you're movin and groovin!

 
STEP 4; Close up frame and put little latch back down. You can either glue it shut, or leave it unglued in case you want to switch up your artwork inside frame, either way works! It should look something like this;

 
Eeek! So pretty! Here's another charm like this, but using a long slide type frame. These type of charms are fun because you can slide the glass around and see what you want your background to be. I chose this gorgeous Nirvana paper and the word Dream from a different Nirvana paper;
 
 
I slid it around until I found a cute spot, like this one has like 4 different corners of different colors touching! It will add a lot of visual interest!

 
(Then just follow the above steps, the sandwiching, etc. ;)
 
 
For the 3rd charm. You will need a fussy cut piece from a Marion Smith Designs Nirvana paper (I liked the number typewriter keys), glossy adhesive, and a Tim Holtz typewriter key charm with the epoxy circle that comes with it.
 
 
I cut out the number 2 because I have 2 little darlings, but you can use whichever you would like of course. (Now. I misplaced my little circle punch in a sea of supplies on my desk if you can believe that, so I just placed the epoxy circle directly on the number and cut out around it, which also works ;) just a little tidbit for ya.) Then you simply use your glossy adhesive and glue the epoxied piece down onto charm, and voila! Super cute and simple!
 
Here are the charms we made today;
 
 
(I may or may not have snuck in a few extra heehee)
 
Grab your jewelry chains of your choice, jump rings,  and maybe if you have some other blings and things to hang, and start assembling your masterpiece!


As you can see, when they are all hanging together in a cluster, they are rather stunning! Making charms is so much fun, I could literally do these for hours! With Marions designs, there are so many gorgeous elements that the possibilities are endless!
 
I hope you enjoyed my tutorial and maybe inspired you to go and create your own charms. It can be such a fun project! Thank you for stopping by and have a lovely day!
 
Love, Sarah