Showing posts with label DIY. Show all posts

Monday, January 19, 2015

Splatter Fun with Marion's Color Lab!!

Hello All!

Keri here and today I want to show you a quick and fun new way to use your pigment powders from your Color Lab collection.

Today, we are going to make funky, splatter-painted flower!

All you need is:

Paper Flower
Color Lab Pigments of your Choice
Small Paint Brush
Water Bottle

Step 1

Start with your "naked" flower and your first color.


Dip the tip of your brush in your powder (it takes VERY little) and then lightly tap your brush over your flower. You will barely be able to see your dust. 

Step 2

Next...grab your water bottle.

LIGHTLY mist over your flower. Do not directly spray your flower or the colors particles will mix together. Try spraying from above your project to allow the water to kind of flutter down.


You can experiment with whether or not to add more powder and repeat the process or if you want to spray it a couple more times to allow the existing spots to "grow."

I decided I wanted to add another color!

Step 3

Before I added my second color, I completely dried my flower with a heat gun. I did this so that my color wouldn't become over saturated and my second color wouldn't mingle too much with my blue...allowing both colors to remain somewhat separate. 


I repeated steps 1 and 2 again, this time with my red Color Lab pigment powder.

This was my fun and funky results!


You can have lots of fun experimenting with color combos. You can see that even though I only used 2 colors, I ended up with light blues, dark blues, purples and my red.

Here's a close up:


Hello 1982!! LOL.

I love my funky little flower!

I can't wait to see what you do with this technique! It can easily be used for making mixed media or scrapbooking backgrounds, as well as on other products to make your own, personalized embellishments.

Until next time...

XOXO,
KERI


Monday, December 22, 2014

Mad Tea Party Last Minute Gift

Hello All!

Keri Sallee here with my last project for 2014. How crazy is that? 

Last week talked about taking a little "me" time and how it's good not only for the mind and body, but also for the projects you're trying to do. Did you try to take a little time of refreshing? I hope so.

With CHA 2015 fast approaching, I wanted to share a project that I did for the first CHA I had the privilege of making projects for Marion.

I was looking at it and I thought "WOW...this would make a perfect DIY, last-minute gift." So I thought I would share it with you today.


I simply took scraps from the "Mad Tea Party" collection and made stripes for my background.


I added a "bouquet" of rolled paper flowers (again...from scraps) and added leaves cut from canvas.


In honor of this collection being all about Alice in Wonderland, I took a quote from the original book: "Who in the World am I? Ah, that's the great puzzle." I used black sticker letters by 7Gypsies.

Easy Peasy! Depending on the number of flowers you made, you could easily make this in 30 minutes to an hour.

Don't have that much time? Cluster some ready made flowers (maybe sprayed with a little Color Lab?!) around a quote and put it in a glassless frame. This is actually an 8.5 x 11 document frame from Wal-mart that cost me about $2.

Have more time? Ink it up! Add some bling or some Junque and Gems or splashes of Color Lab. There possibilities are endless...as are the people who would enjoy a little homemade gift that features their favorite quote.

I hope you are remembering to take time for you during the crazy holiday season.

Have a blessed Christmas and I look forward to spending more time with you in 2015. 

XOXO,
KERI


Monday, September 29, 2014

Simple Paper Angel Wings

Good Morning All!

Keri Sallee here and I am so excited to show you how to make your own angel wings using Marion's "Mad Tea Party" collection.

Here is my finished project:


Here is a step-by-step Snapguide on how to make them!


Here are few close-ups pictures!


I hope you've enjoyed today's project and I can't wait to see what you do with it!

XOXO,

KERI

Monday, May 19, 2014

Bloom Impression Tool Tips by Tonya Gibbs

Hi everyone, I'm so excited to bring you a few tips and techniques for using Marion's new Bloom Impression Tool.  Look at at these beautiful flowers you can make in just a few minutes.


I thought I would share a few tips beyond Marion's already amazing video tutorial. In today's tutorial we will make the flower on the right. However, the flower on the left follows the same steps, just a different petal shape.

Remember these simple things before getting started. 
  • Papers 20lb - 80lb  work best.  The flower being demonstrated below is made from 80lb white cardstock paper with no texture.  The flower above on the left was made from standard 20lb copy paper.    If your paper is too thick then it will be difficult for the paper to shape.
  • Paper should not be too wet!  It simply needs to be lightly misted. Thicker papers may require more moisture than thinner papers.  If the paper is too thin and too wet, it may rip when using the tool.
  • For both flowers above I used Marion's New Bloom Impression Dies


Here are the steps.  Since Marion has already done a video tutorial, I thought I would do a written tutorial with my special tips. 


  1. Start with 5 large petals, 5 small petals, 2 leaves,  7 stamens  (6 colored the desired stamen color and 1 colored the same as your flower color)
  2. Mist your hand with water or your favorite watercolor spray.  By spraying your hand you will avoid excess moisture on your petals. Wetting the paper loosens the starches in the paper and allows the paper to be more pliable. When the paper dries, the starches help to keep the shape of your petal.   Too much moisture will cause the paper to rip.  The petal should be cool to the touch.  If the paper is soaked it will rip in the tool. It may take some practice getting the right ratio.  I have found 1 spray with a fine mist is perfect.   
  3. Pat the petal in you palm rotating it to saturate both sides.
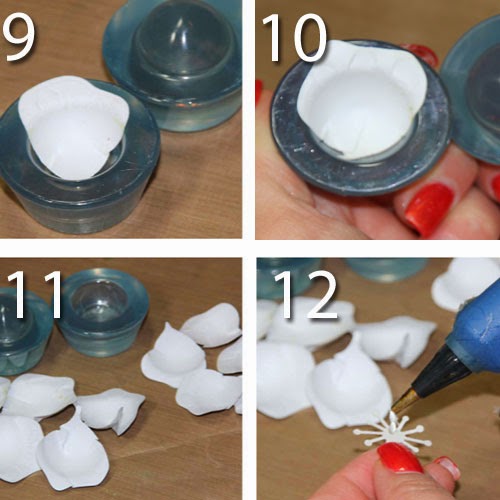
  4. Place the petal over the hole of the bottom of the tool, I made sure mine went all the way to the rim of the acryclic. It is ok if the petal is over the edge a bit. 


  1. Carefully place the top onto the petal pressing it firmly in place.
  2. twist the tool back and forth 2 times is enough.
  3. open the cap to see the bowl shaped petal
  4. This is a look at the smaller petal (You can see a gap around the edges - this ok)  Repeat steps 5-7


  1. Here is the shape of the smaller petal after twisting the tool.
  2. This is a close up of the larger petal after twisting the tool.  You can see a side by side comparison of how the two have different size petals yield a different shape using the same technique.
  3. Repeat steps 2-7 until all 10 petal shapes have been molded.
  4. Use the stamen that is your flower color to build out your first base. I used hot glue for the sake of time, but a quick dry wet glue can be used instead.

  1. Place a small amount of glue on one arm of the stamen, and place your large flower so that the cup barrels outward.
  2. This is how your first flower petal will look.  If you prefer you can place the stamen to the inside of the flower rather the outside.  This would give a cleaner look to the bottom of your flower.  The stamen will be invisible when the flower is complete.
  3. Overlap your next petal gluing it at the base
  4. Continue until all 5 large petals have been glued into place. Slightly overlapping one top of the other. 


  1. To start the inside row, off set your first petal between two petals on the back row. 
  2. Continue layering the next petal slightly overlapping the first until all 5 small petals have been added.
  3. I used Copic marker Y32 to color my remaining stamens, I colored 6 or 7 for the next step. 
  4. Adhere your first stamen flat to the inside of your flower shape.  This will offer a nice base for your stamen cluster. 


  1. Gather the petals of the stamen in the center and apply a small amount of glue to the back of the stamen (BE VERY CAREFULL IF YOU ARE USING HOT GLUE)
  2. Add the Next stamen on top of the glue
  3. Repeat steps 21 - 22 until the desired thickness of your flower center is achieved.
  4. The stamens now look like a cluster.


  1. Add your stamen cluster on top of the flat stamen inside your flower center.
  2. You can leave the center alone, or dress it up a bit more with a pearl, rhinestone, piece of jewelry or a button. Be creative and make your flowers unique.   I used a pale yellow rhinestone (basically because I have tons in my stash that never seem to get used.  I made it match the stamens better by coloring it with the Green Gold PITT Artist Pen #268.
  3. Cup your leaves the same way you did your petals in steps 2 -  9. 
  4. This is how the leaves look when you remove them from the bowl.


  1. Place the cupped shape over the bottom of your flower. Make sure you can see the leaves when the flower is turned over. You may have to glue it close to the edge.  
  2. I like to include a few petals for better composition and have them overlap like we did the flower petals. 


Here is a glimpse at the finished flower.   Top and side view. 
`


It really is super easy to create flowers now using this tool.  I look forward to sharing additional flower tutorials with you soon.   I have a few ideas for different techniques.    


Did you hear that the tool is now available at Scrapbook.com?  Get your's while supplies last!  

If you have this tool, we would love to see the flowers you create   #MarionSmithDesigns or #BloomImpressionTool in your social media outlets. 

If you have any other questions or need more info on this tool, please leave them in the comments, and a DT member will try and get back with you.  

Thanks for stopping in today,

Tonya Gibbs


DESIGN TEAM CALL REMINDER:   - deadline for submissions is May 30, 2014. Here is the link with all the details!

Tuesday, April 15, 2014

Shabby Fabric Flower Tutorial by Tonya Gibbs


Hi everyone HAPPY IRS day if you are here in the US (LOL - GRUMBLE GRUMBLE)   Here is a post that will help you get over those tax day blues!


I'm sharing with you a simple tutorial for creating these beautiful Shabby Flowers using Marion Smith Designs Rose Petal Die (the one in the center of the photo below). Oh and BTW -  the Bloom tools are shipping to retailers now - so exciting I hope you got one. I used embossing powder to recolor the filigree flowers from antique brass to gold and silver.

For my tag I used the Garment District collection and Marion's Junque and Gems for my Flower centers.


I've attached my flower to this tag.  I created the tag background during my January Ustream.  Can you say ohhhhhhh soooo Shabby?


Here is a process video of me making the flower.


 I'm working on a few projects now using these flowers.  My next few posts will be using them. 


Thanks for stopping in today,

Tonya Gibbs
http://www.psychomoms.com


Flower Supplies:

Marion Smith Designs - Junque & Gems
Marion Smith Designs - Bloom Impressions Dies  - Rose Petal (Large die)
Unbleached Muslin
Needle
Thread
Desired Flower Center


Tag:
Golden Gesso (Black)
Liquitex - Matt Medium Fluid
Marion Smith Designs - Garment District Paper - 12 x 12
The Crafter's Workshop - 6 x 6 Doodling Templates - Mini Bricks
Advantus - Tim Holtz - Idea-ology - Sanding Block - also known as Sanding Grip
Ranger Ink - Archival Ink Pad - Jet Black
Ranger Ink - Archival Ink Pad - Coffee
Ranger Ink - Inkssentials - Dylusions Ink Spray - Melted Chocolate
Ranger Ink - Inkssentials - Heat It Craft Tool
Ranger Ink - Tim Holtz - Distress Paint - Metallic - Tarnished Brass
Ranger Ink - Tim Holtz - Distress Paint - Walnut Stain
Ranger Ink - Tim Holtz - Distress Ink Reinkers - Walnut Stain
Ranger  Ink - Tim Holtz Distress Ink Pads - Antique Linen
Ranger Ink - Inkssentials - Specialty Stamping Paper - 12 x 12
Prima - Bretton Vines Collection - Flower Embellishments - Purity
Prima - Flower Embellishments
Prima - Vintage Trinkets Collection - Metal Embellishments - Keys
Prima - Julie Nutting - Cling Mounted Stamps - Mixed Media Doll - Six
Sizzix - Tim Holtz - Alterations Collection - Movers and Shapers L Die - Vintage Valise
Sizzix - Bigz Die - Wings, Angel
Silhouette America - Cameo - Electronic Cutting System
Tattered Angels - Glimmer Mist Spray - 2 Ounce Bottle - Antique Brass
Tattered Angels - Glimmer Mist Spray - 2 Ounce Bottle - Wheat Fields
Copic - Sketch Marker - E50 - Egg Shell
Copic - Sketch Marker - E55 - Light Carmel
Copic - Sketch Marker - E30 - Bisque
Copic - Sketch Marker - E37 - Sepia
Copic - Sketch Marker - E11 - Bareley Beige
Copic - Sketch Marker - E01 - Pink Flamingo
Copic - Sketch Marker - R20 - Blush
Copic - Sketch Marker - 0 - Colorless Blender
Copic - Sketch Marker - BV23 - Grayish Violet
Tsukineko - Memento - Dye Ink Pad - Tuxedo Black
Faber-Castell Design Memory Craft - Color Gelatos - Metallic - Gold
Vintaj Metal Brass Company - Metal Jewelry Chain - Flat Link

Misc.  Pocket Watch
Misc. Vintage Hymn paper

- See more at: http://www.psychomomscrapbooks.blogspot.com/2014/01/ustream-baggage-mixed-media-canvas-by.html