Hi everyone, I'm so excited to bring you a few tips and techniques for using Marion's new Bloom Impression Tool. Look at at these beautiful flowers you can make in just a few minutes.

I thought I would share a few tips beyond Marion's already amazing video tutorial. In today's tutorial we will make the flower on the right. However, the flower on the left follows the same steps, just a different petal shape.
Remember these simple things before getting started.
- Papers 20lb - 80lb work best. The flower being demonstrated below is made from 80lb white cardstock paper with no texture. The flower above on the left was made from standard 20lb copy paper. If your paper is too thick then it will be difficult for the paper to shape.
- Paper should not be too wet! It simply needs to be lightly misted. Thicker papers may require more moisture than thinner papers. If the paper is too thin and too wet, it may rip when using the tool.
- For both flowers above I used Marion's New Bloom Impression Dies
Here are the steps. Since Marion has already done a video tutorial, I thought I would do a written tutorial with my special tips.

- Start with 5 large petals, 5 small petals, 2 leaves, 7 stamens (6 colored the desired stamen color and 1 colored the same as your flower color)
- Mist your hand with water or your favorite watercolor spray. By spraying your hand you will avoid excess moisture on your petals. Wetting the paper loosens the starches in the paper and allows the paper to be more pliable. When the paper dries, the starches help to keep the shape of your petal. Too much moisture will cause the paper to rip. The petal should be cool to the touch. If the paper is soaked it will rip in the tool. It may take some practice getting the right ratio. I have found 1 spray with a fine mist is perfect.
- Pat the petal in you palm rotating it to saturate both sides.
- Place the petal over the hole of the bottom of the tool, I made sure mine went all the way to the rim of the acryclic. It is ok if the petal is over the edge a bit.

- Carefully place the top onto the petal pressing it firmly in place.
- twist the tool back and forth 2 times is enough.
- open the cap to see the bowl shaped petal
- This is a look at the smaller petal (You can see a gap around the edges - this ok) Repeat steps 5-7
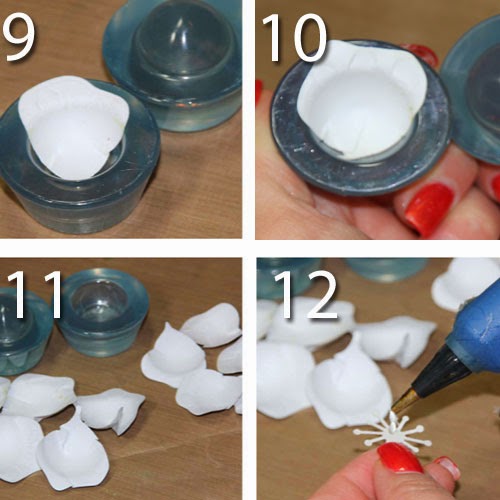
- Here is the shape of the smaller petal after twisting the tool.
- This is a close up of the larger petal after twisting the tool. You can see a side by side comparison of how the two have different size petals yield a different shape using the same technique.
- Repeat steps 2-7 until all 10 petal shapes have been molded.
- Use the stamen that is your flower color to build out your first base. I used hot glue for the sake of time, but a quick dry wet glue can be used instead.

- Place a small amount of glue on one arm of the stamen, and place your large flower so that the cup barrels outward.
- This is how your first flower petal will look. If you prefer you can place the stamen to the inside of the flower rather the outside. This would give a cleaner look to the bottom of your flower. The stamen will be invisible when the flower is complete.
- Overlap your next petal gluing it at the base
- Continue until all 5 large petals have been glued into place. Slightly overlapping one top of the other.

- To start the inside row, off set your first petal between two petals on the back row.
- Continue layering the next petal slightly overlapping the first until all 5 small petals have been added.
- I used Copic marker Y32 to color my remaining stamens, I colored 6 or 7 for the next step.
- Adhere your first stamen flat to the inside of your flower shape. This will offer a nice base for your stamen cluster.

- Gather the petals of the stamen in the center and apply a small amount of glue to the back of the stamen (BE VERY CAREFULL IF YOU ARE USING HOT GLUE)
- Add the Next stamen on top of the glue
- Repeat steps 21 - 22 until the desired thickness of your flower center is achieved.
- The stamens now look like a cluster.

- Add your stamen cluster on top of the flat stamen inside your flower center.
- You can leave the center alone, or dress it up a bit more with a pearl, rhinestone, piece of jewelry or a button. Be creative and make your flowers unique. I used a pale yellow rhinestone (basically because I have tons in my stash that never seem to get used. I made it match the stamens better by coloring it with the Green Gold PITT Artist Pen #268.
- Cup your leaves the same way you did your petals in steps 2 - 9.
- This is how the leaves look when you remove them from the bowl.

- Place the cupped shape over the bottom of your flower. Make sure you can see the leaves when the flower is turned over. You may have to glue it close to the edge.
- I like to include a few petals for better composition and have them overlap like we did the flower petals.

Here is a glimpse at the finished flower. Top and side view.
`

It really is super easy to create flowers now using this tool. I look forward to sharing additional flower tutorials with you soon. I have a few ideas for different techniques.
Did you hear that the tool is now available at Scrapbook.com? Get your's while supplies last!
If you have this tool, we would love to see the flowers you create #MarionSmithDesigns or #BloomImpressionTool in your social media outlets.
If you have any other questions or need more info on this tool, please leave them in the comments, and a DT member will try and get back with you.
Thanks for stopping in today,
Tonya Gibbs
DESIGN TEAM CALL REMINDER: - deadline for submissions is May 30, 2014. Here is the link with all the details!

Wow Tonya what a great tutorial and tips on how you used the Bloom Tool....so excited to play and give this a try...
ReplyDeletegreat job! I am excited to try all your tips!
ReplyDeleteTonya thank you for this awesome tutorial, I really enjoy this form for a change and so thankful for you taking the time to teach
ReplyDeleteI have to get one of these tools. They are awesome.
ReplyDeleteWhat die did you use for the petals please?
ReplyDeleteI used Marion's Dies The flower on the left is the Peony and the Flower on the right is the Rose
DeleteI keep seeing that this tool is out of stock. Any word on how to get my hands on one?
ReplyDeletethanks
susan
I keep seeing that this tool is out of stock. Any word on how to get my hands on one?
ReplyDeletethanks
susan