
Into this!


The first thing you'll need to do is go over to Marion Smith Designs shop and grab some of her beautiful printables! You will need these for your images ;) I used the ephemera sheet from The Scarlet Collection, and 2 sheets from the awesome new Nirvana collection which will be available in stores soon!! Fussy cut your favorite elements that you want to be the "theme" of your jewelry.
Here is a supply list for you;
Marion Smith Designs paper
Vintage book paper words (cut out individually)
Glossy Accents (or any other clear type quick drying glossy adhesive)
Tim Holtz Glass Facets
Tim Holtz Typewriter Charms with Epoxy Circles
Ranger Memory Frames & Memory Glass
Chain for Necklace/Bracelet
Jump Rings
Other miscellaneous pieces you want to add to your jewelry, blings, things of that nature
For the first type of charm, you will need your glossy adhesive, fussy cut pieces, some old book paper words, and a glass facet piece.

STEP 1; With the fussy cut paper pieces, glue them together using the glossy adhesive, creating a mini collage.

STEP 2; Drop some glossy adhesive on top of your collage, and spread it around using your finger!

STEP 3; Place the glass facet on top of that, pushing down so the pressure pushes out any air bubbles. You should come out with something like this;

Good?! See, easy peasy!
For the second charm. You will need; Marion Smith Designs printable paper, vintage book words, and a Ranger memory frame and 2 pieces of the memory glass.
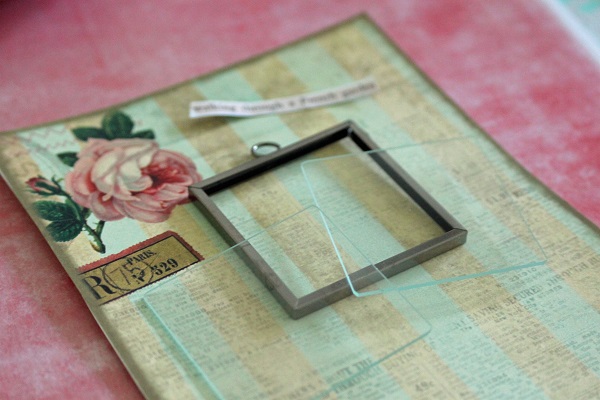
STEP 1; Lay glass piece over element on paper that you want to use.

STEP 2; Cut out around glass piece so you get the perfect size, and glue down the words on top of your paper. (under glass piece lol!)
STEP 3; Sandwich paper between 2 glass pieces and carefully stuff into memory frame. There is a little metal piece on upper right corner of frame that you lift open and the whole frame bends open. Hint; If you use double sided paper, you'll get pretties on both sides in case the charm flips when you're movin and groovin!

STEP 4; Close up frame and put little latch back down. You can either glue it shut, or leave it unglued in case you want to switch up your artwork inside frame, either way works! It should look something like this;

Eeek! So pretty! Here's another charm like this, but using a long slide type frame. These type of charms are fun because you can slide the glass around and see what you want your background to be. I chose this gorgeous Nirvana paper and the word Dream from a different Nirvana paper;

I slid it around until I found a cute spot, like this one has like 4 different corners of different colors touching! It will add a lot of visual interest!

(Then just follow the above steps, the sandwiching, etc. ;)
For the 3rd charm. You will need a fussy cut piece from a Marion Smith Designs Nirvana paper (I liked the number typewriter keys), glossy adhesive, and a Tim Holtz typewriter key charm with the epoxy circle that comes with it.

I cut out the number 2 because I have 2 little darlings, but you can use whichever you would like of course. (Now. I misplaced my little circle punch in a sea of supplies on my desk if you can believe that, so I just placed the epoxy circle directly on the number and cut out around it, which also works ;) just a little tidbit for ya.) Then you simply use your glossy adhesive and glue the epoxied piece down onto charm, and voila! Super cute and simple!
Here are the charms we made today;

(I may or may not have snuck in a few extra heehee)
Grab your jewelry chains of your choice, jump rings, and maybe if you have some other blings and things to hang, and start assembling your masterpiece!


As you can see, when they are all hanging together in a cluster, they are rather stunning! Making charms is so much fun, I could literally do these for hours! With Marions designs, there are so many gorgeous elements that the possibilities are endless!
I hope you enjoyed my tutorial and maybe inspired you to go and create your own charms. It can be such a fun project! Thank you for stopping by and have a lovely day!
Love, Sarah
Sarah this is fantastic and pretty easy do do :) But what a result!!! Thank you for sharing xoxo
ReplyDeletewhooo the best thing is I have everything to make this.....thanks for sharing...so pretty and romantic and chic....you did a fabulous job...thanks.
ReplyDeletehugs peggy lee
LOVE it Sarah!! This is fantastic.
ReplyDeleteLove this shabby chic look, in love !
ReplyDeleteSARAH - these are awesome. Thank you so much for the inspiration!
ReplyDeleteSuch a beautiful project Sarah. So much fun
ReplyDeleteGorgeous!
ReplyDeleteWow, Sarah... Beautiful! I love your mix of sizes and styles!
ReplyDeletePlease check out how your accordion card project inspired me...
http://handstoworkhearttolove.blogspot.com/2013/09/inspired-accordion-fold-birthday-card.html
Hugs!
wow! I would wear this today!!!! It's amazing!
ReplyDeleteFabulous! love them!
ReplyDeleteGorgeous Sarah! Well done!
ReplyDelete