Showing posts with label Printables. Show all posts

Tuesday, September 24, 2013

It's Fall Y'all!

Hey there! It's Sarah here, and I wanted to share a Fall card with you! I am so excited that it is fall, it is one of my favorite seasons! The colors are just so beautiful, especially on the leaves. I wanted to create that same color effect, so I took some of the "Up & Away" paper from Marion Smith Design's new Nirvana collection, and a piece of an aged looking paper with text on it from the Scarlet printables collection. I die cut the papers into a large leaf and a small leaf and used water colors right on the die cut leaves to create the pretty fall colors!


Also, I printed out the Tattered Rolled Roses Spring Mix Printable flowers, and used some Walnut Distress Ink to grunge them up.


Add a grungy tag, burlap, and some brown glittery berries and you have yourself a beautiful fall card for someone special!

 
Thank you so much for stopping by and have an amazing day!
 
Love, Sarah


Tuesday, September 3, 2013

A Charming Tutorial

Well hello there, happy happy Tuesday to you! Sarah Bargo reporting here and I have a fun tutorial for you today! We're going to turn these;

 
Into this!


It's not something new, but it's something I love to do! Have you ever tried making your own charms to wear? I always loved handmade artsy necklaces and bracelets with lots of blings and baubles, and I always wanted to try making them but was too intimidated by it. Now that I see how simple and fun it is, I am HOOKED!! Lets get started! There are 3 different variations we are going to do, all work perfect and easily!

The first thing you'll need to do is go over to Marion Smith Designs shop and grab some of her beautiful printables! You will need these for your images ;) I used the ephemera sheet from The Scarlet Collection, and 2 sheets from the awesome new Nirvana collection which will be available in stores soon!!  Fussy cut your favorite elements that you want to be the "theme" of your jewelry.

Here is a supply list for you;

Marion Smith Designs paper
Vintage book paper words (cut out individually)
Glossy Accents (or any other clear type quick drying glossy adhesive)
Tim Holtz Glass Facets
Tim Holtz Typewriter Charms with Epoxy Circles
Ranger Memory Frames & Memory Glass
Chain for Necklace/Bracelet
Jump Rings
Other miscellaneous pieces you want to add to your jewelry, blings, things of that nature


For the first type of charm, you will need your glossy adhesive, fussy cut pieces, some old book paper words, and a glass facet piece.

 
STEP 1; With the fussy cut paper pieces, glue them together using the glossy adhesive, creating a mini collage.

 
STEP 2; Drop some glossy adhesive on top of your collage, and spread it around using your finger!
 
 
STEP 3; Place the glass facet on top of that, pushing down so the pressure pushes out any air bubbles.  You should come out with something like this;
 
 
Good?! See, easy peasy!
 
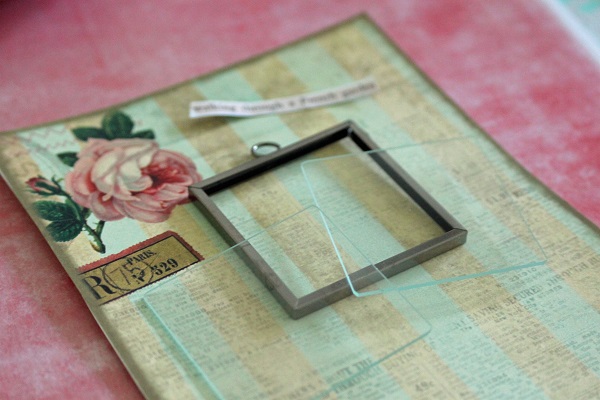
For the second charm. You will need; Marion Smith Designs printable paper, vintage book words, and a Ranger memory frame and 2 pieces of the memory glass.
 
 
STEP 1; Lay glass piece over element on paper that you want to use.
 
 
STEP 2; Cut out around glass piece so you get the perfect size, and glue down the words on top of your paper. (under glass piece lol!)
 
STEP 3; Sandwich paper between 2 glass pieces and carefully stuff into memory frame. There is a little metal piece on upper right corner of frame that you lift open and the whole frame bends open. Hint; If you use double sided paper, you'll get pretties on both sides in case the charm flips when you're movin and groovin!

 
STEP 4; Close up frame and put little latch back down. You can either glue it shut, or leave it unglued in case you want to switch up your artwork inside frame, either way works! It should look something like this;

 
Eeek! So pretty! Here's another charm like this, but using a long slide type frame. These type of charms are fun because you can slide the glass around and see what you want your background to be. I chose this gorgeous Nirvana paper and the word Dream from a different Nirvana paper;
 
 
I slid it around until I found a cute spot, like this one has like 4 different corners of different colors touching! It will add a lot of visual interest!

 
(Then just follow the above steps, the sandwiching, etc. ;)
 
 
For the 3rd charm. You will need a fussy cut piece from a Marion Smith Designs Nirvana paper (I liked the number typewriter keys), glossy adhesive, and a Tim Holtz typewriter key charm with the epoxy circle that comes with it.
 
 
I cut out the number 2 because I have 2 little darlings, but you can use whichever you would like of course. (Now. I misplaced my little circle punch in a sea of supplies on my desk if you can believe that, so I just placed the epoxy circle directly on the number and cut out around it, which also works ;) just a little tidbit for ya.) Then you simply use your glossy adhesive and glue the epoxied piece down onto charm, and voila! Super cute and simple!
 
Here are the charms we made today;
 
 
(I may or may not have snuck in a few extra heehee)
 
Grab your jewelry chains of your choice, jump rings,  and maybe if you have some other blings and things to hang, and start assembling your masterpiece!


As you can see, when they are all hanging together in a cluster, they are rather stunning! Making charms is so much fun, I could literally do these for hours! With Marions designs, there are so many gorgeous elements that the possibilities are endless!
 
I hope you enjoyed my tutorial and maybe inspired you to go and create your own charms. It can be such a fun project! Thank you for stopping by and have a lovely day!
 
Love, Sarah


Tuesday, August 27, 2013

Fly away

Hi everyone,

I made today's card with Marion's printables :)


I used this fantastic Folder Book Kit Printable: 


but in stead of making a book I made this shabby card.

Did you see our latest release?
Fantastic NIRVANA papers and stamps.
I´ll give you a small sneak peek:


Please stay tuned and come back later today for more inspirations.
My friend Sarah prepared something special for you.

Have a nice day!
Aneta

Shabby Greeting Card With A Twist

Well hello there! Welcome to my first post with Marion Smith Designs woohoo! Today I want to share a card with you! I wanted to send something to someone special I haven't seen in a long time, so I wanted to create a card, but spice it up a little bit! I used papers from Marion Smith's printables, Scarlet, Folder Book Kit, & Life Journal Book that you can find here! Make sure you check them out, they are stunning!

 
Sometimes you like to stick pictures of your kids or pups or whoever in cards right?  For that reason I thought some pockets were much needed, so I created a pull-out accordion effect;
 
 
Now it has 3 pockets I can cram stuff into, like tags!
 
 
Marion's designs are so absolutely beautiful, all you really have to do is cut them out strategically, and the results are gorgeous! Like this postcard;
 
 
Just add a little tape at the top to make it look like it's "taped on" and you're all set! A perfect little cozy place to write your sentiments ;)
 
I used a few other stamps & embellishments I had handy, but other than that I mostly used printable papers from Marion's shop.There are so many beautiful elements in every line, it's so easy to mix & match!


I hope you enjoyed my first project and thank you so much for stopping by! Wasn't Aneta's card gorgeous?! I am so honored to be a part of such an amazing team!
 
Love, Sarah


Sunday, August 25, 2013

A Special Tag by Kim Price


Hello all. I wanted to call in today to share my very first post as part of this amazing new Design Team. I have been having a great time playing around with some of the amazing printable products available for download here

One of the first things I noticed about these designs is that they mix and match so easily, you can use elements and papers from different collections or downloads to create depending on your project on the day. 

I've used pink tickets and large rose element from the Primrose Printable Kit as well as elements and printable papers from Vintage Telegram, adding some flowers, trim and a cameo resin for those finishing touches. 

This really was a quick and easy project to make and would be lovely to use as an embellishment on a layout, attached to a gift for someone special or just as a decorative piece on it's own. 

You can find more of my designs on my blog here. Thank you for calling in today.


Monday, August 19, 2013

Making Your Own Rub Ons

Bet you never thought it was possible right?  Well, I have great news for you!  Utilising the wonderful printable items from Marion's collections, you can absolutely make your very own custom rub ons!  Let me tell you how....

You will need the following items:


Then, follow these steps:

  1. Open PDF file in Acrobat
  2. Insert a sheet of Safmat paper into printer tray.  Be sure to place it the correct way up, the shiny side is what needs to be printed on.  The other side is just the backing sheet.
  3. Under Print options, properties, Advanced - select Reverse Print.
  4. Print file and allow to dry for a few seconds.
  5. Cut around image and remove backing sheet - burnish on surface as you would with a rub on!
  6. If you are using an inkjet printer, you may want to lightly spray the finished image with a fixative (or hairspray works just as well!).


Here is a picture of a rub on I made from the Scarlet collection.  I burnished it on to a sheet of old French text paper.  Because the Safmat is translucent, the text paper shows through slightly.  I love that!


And here I have burnished a butterfly on to a photo - I think it looks perfect!


I really hope you give this technique a go!  It's a great way to get more mileage out of your Marion Smith Printables!

Cheerio!

Maggie Armstrong