Thursday, April 10, 2014

Gift Tag


Hello my friends, 
My newest project for MSD is a gift tag 
and a special tag box.

Usually when I want to give something from myself, 
I give a personal card.

But I think tags can also be very nice gifts.
You can put it in a beautiful box in the same style:


I used MOTLEY:


and some sweet doilies and gems 


So please let me know how you like this idea?

Thank you for stopping by and let me remind you about my DOUBLE GIVEAWAY
if you feel like winning this wonderful notebook I made :)

GIVEAWAY TIL 30.04

Thank you for stopping by and have a nice day everybody :)
xoxo
Aneta 

Tuesday, April 8, 2014

It's Those Little Touches

Hi fellow crafters!

I have been having lots of fun creating some little goodies to accompany my Marion Smith Designs mini-albums (will be posting about those later this month!).  I purchased some giant paper clips at the local stationery shop and combined them with some gorgeous Junque Gems and Resins by MSD.  This is the result...


It is important to adhere these with a couple of layers of good quality wool felt sandwiching the paper clip. This keeps the piece sturdy.  And a glue gun is essential too!   Here are a few closeups...


And what's a little project without a few 'action' shots?!  Here are some paperclip/bookmarks in use...


So easy!  They have worked perfectly to provide those little finishing touches that you sometimes need!

Thanks for stopping by!

Maggie

Monday, April 7, 2014

Seed Packet

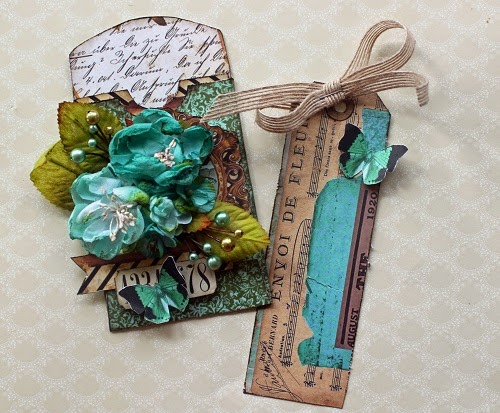
Happy Monday woot woot! Sarah's in the houuuse! I am so thankful it is Spring! There are so many wonderful things about Spring such as fresh air, coffee on the front porch, and gardening! I love gardening! There is something about going outside, working your fingers in the cool dirt, and seeing a tiny little seed produce something delicious to eat or a vibrant flower that is not only beautiful, but it attracts beautiful butterflies! How awesome is that?! This inspires me to create garden themed gifts to give, and one of the most fun and easy kind is a seed packet. I just love giving little trinkets when I see people and this is a good one, especially to someone who gardens ;) In the new line Never Grow Up, there is a sheet of paper that has a pocket type design that you cut out, and it looks like this;

 
Just cut the pocket out, fold it, and embellish!
 
 
I lined the inner part of the flap with a  different patterned paper,

 
And created a cute tag to slide inside!

 
Did you see the blog hop with Petaloo last week? There was so much beautiful inspiration wowza! I had a few flowers left over so I used them on this!
 
 
Aren't they beautiful? Almost look real! They were the perfect addition to this seed packet! Now it looks super fancy schmancy!


The possibilities are endless! I hope this inspires you to make your very own seed packets! Have a beautiful day!


Sunday, April 6, 2014

Spring "Special" Layout

Welcome to the Blog today!  Glad you stopped by!  I made this cute layout using the "Motley" papers, and a fun hanger I found!  I have had the hanger a while, so I am sorry I don't remember where I got it.  It can be googled and maybe found that way!
stitching and some modeling paste add texture to these layers of paper

Don't you love those little Junque and Gems added for cuteness??

This is a closeup of the Modeling Paste and the stencils.  The bottom stencil damask was made by Misting right on the lined paper.
The Modeling paste is on the top of the other stencil 

The flower photo is one of my instagrams made into a little foursome.  I also punched out a little banner from the darling Motley papers and stitched it to the lace.  It made a cute addition to the hanger!

Used some darling Junque and Gems!

Supplies were from the Motley Line:


Thanks for stopping by and please join us again soon for more creative ideas!!
Colette Nederhoff

Saturday, April 5, 2014

Easter Basket by Tonya Gibbs

Happy Spring! Easter is right around the corner, and today I thought I would share with you this simple little Easter basket that you can make for a special gift.
 
 
I started with a cut file from the Silhouette Store by Lori Whitlock and Marion Smith's papers from the Mad Tea Party Collection.


Cut out the file, and add score tape to the flaps.  If you want the edges to be inked, now would be a good time to do that.  Your box will look like the photo below when assembled.
 
 
Attach your handle to the inside of the box, using the holes for the brads to line the handles up.
I used Mono Adhesive to attach mine. 
 
Before attaching my handle I also added some lace on the backside of the handle to soften up the edge, and mask the design from the back of the paper.


I then added a little piece of burlap to the inside of the basket to mask the pattern from the inside of the box.
 
 
Now the fun part - decorating the basket!
 
 
I made a flower using Marion Smith's new Bloom Impression Dies.


I started with 5 cuts of each of the Peony Petals and the Stamen from the Stamen and Leaves dies.
Prep them by rolling them with a stylus (Marion's Tool is shipping this week so this process is going to be way faster in the future!).  I used thin copy paper to cut these out.


Take one of the Stamen pieces and begin to place your largest petals along the outside of the stamen. Make sure your petals overlap slightly to fill in the gaps.  I used Tombo Mono Adhesive to glue these pieces together.


Do a second layer with the next smallest petals on top of the original stamen. (this will hide the stamen from view).  Repeat this process with the next row. You shouldn't need anymore stamens.  Just continue to layer the smaller petals until all petals are used. Make sure you offset each row so that a petal is between two petals below.
 
 
I then colored both sides of the remaining stamens with a Copic YR31. Crinkle the Stamens, then layer them one inside the other. I wadded them up into a ball to crinkle them even more. Add that to the center of  your flower, and gently curl your flower petals downward.


I then sprayed my flower with Lindy's Stamp Gang Crème Brulee Cream Starburst Stain.
 
 
For a final touch I went over the flower with some Ranger Distress Ink by Tim Holtz in Spun Sugar.
 
 
Then finished building out the clusters with  a few leaves from Marion's Stamen and Leaves die, and a brass filigree flower from her Junque & Gems.  The butterflies were fussy cut from the b-side of the paper used to cut the basket.  A floral vine was used to soften the edge of the handle.  
 
 
These baskets were so fun to make.  My nieces and nephews are going to love them.  It is a small way that I can spoil them.  I hope you have enjoyed my tutorial. 
 
Thanks for stopping in today,
Tonya Gibbs


Thursday, April 3, 2014

Home sweet Home- by Ana Paula Leal


Hello, 

Ana Paula today bringing you a project to decorate your home in a shabby style 
.


I bought this frame from my favorite woodworker,
it is divided into small frames that I lined with beautiful papers by  Marion Smith Design.


After  I lined each fund, I painted the frame with diluted white paint,
and , to give a patina effect,
the entire set was sanded after dry well.


The project was decorated with beautiful paper flowers Petaloo and small  resin roses by Marion  Smith


Beautiful metal ornaments gave an additional charm to the piece,
which emphasized soft colors and delicate embellishments.


Is ready to hang on a wall and convey the message that this is:
 a sweet and pleasant home.


Thanks for looking our blog!

Ana Paula Leal