 |
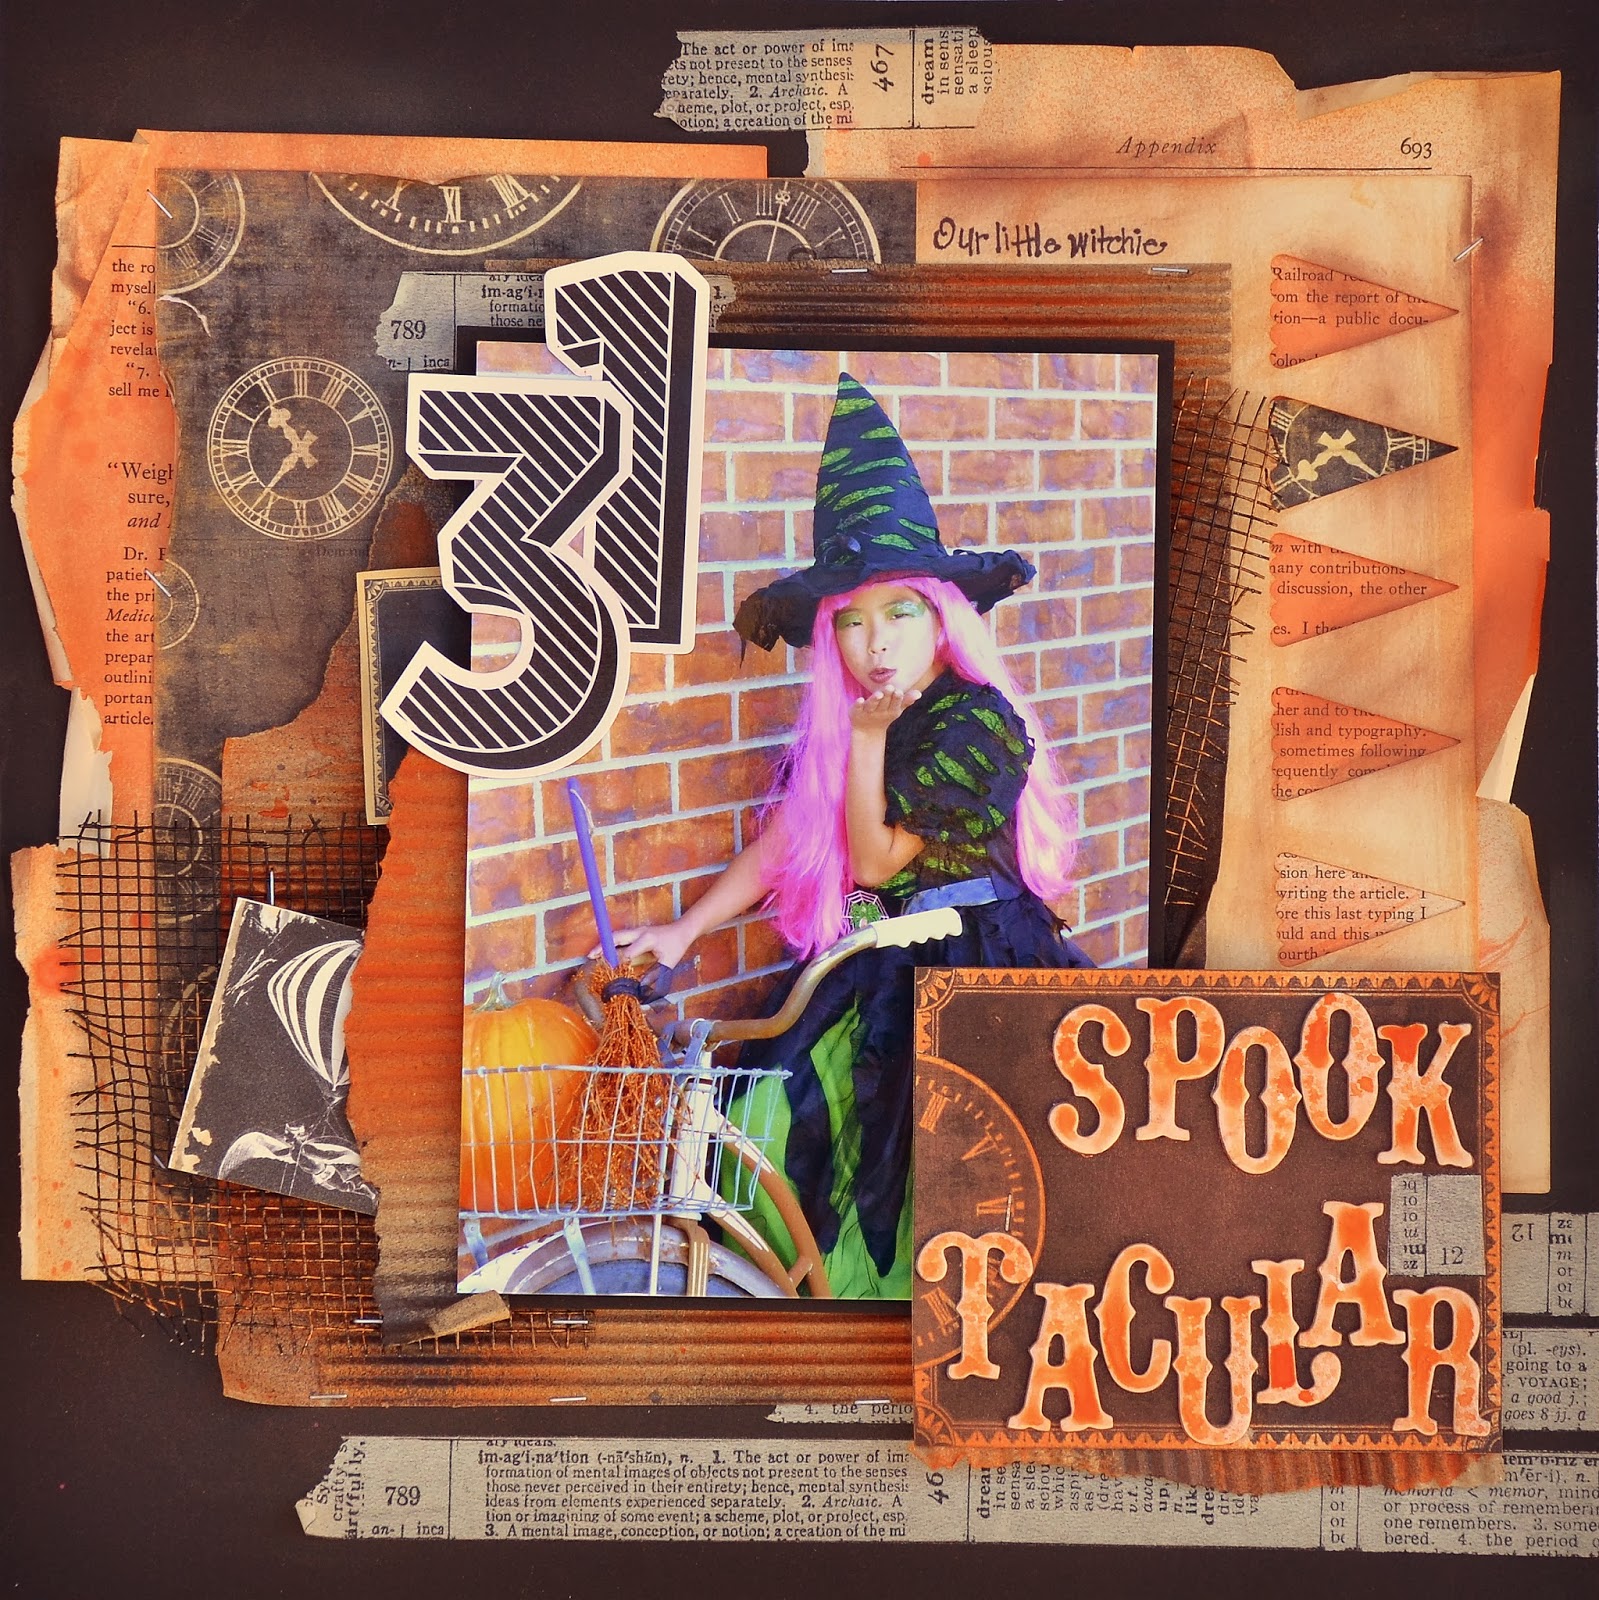
| Our Little Witchie
This project has lots of layers created with antique book paper, Nirvana clocks, metal mesh, corrugated cardboard and washi tape.
I created several layers on top of the base 12X12 of black chalkboard paper.
After tearing apart several old books, I used those pages to add the next layer. I misted these papers with Tattered Angels Pumpkin Spice Mist.
To create the pennants along the left hand side, I punched with a punch and then backed one of them with clock paper.
The corrugated cardboard layers have been ripped and sprayed with Tattered Angels Charcoal mist and also the Pumpkin Spice.
The Metal mesh was something I had in my stash - and it was perfect to add some cool dimension!
My title was made with Nirvana elements and some Thickers white letters sprayed with the pumpkin mist.
Staples and Washi tape add some interest in several places! I really love how all these layers create texture on this layout.
I love the big numbers from Pink Paislee and they worked perfectly with this theme!
Hope you will be enjoying making some Halloween layouts. Go use the Nirvana Papers as they work perfectly!
Blessings
Colette
|

Thursday, October 10, 2013
Our Little Witchie Layout
Happy October Crafting Friends! It's a fantastic time of year with all the Holidays and fun creative ways to celebrate!! I had a fun photo from last year's Halloween so I printed out some Nirvana printables and got busy making this layout.

Tuesday, October 8, 2013
Dream Big
Hi everybody,
Aneta here and it's my absolute pleasure to inspire you
today.
I made this card for everybody who dream big.
I'm a dreamer and my life has showed me time and again
that if you dream big everything is possible :)


I used :


Did you see the yummi Junque and Gems Marion is preparing for us?

Please visit us tomorrow for more daily inspirations.
And don't forget to subscribe :)
Thank you and have a nice day!
xoxo
Aneta
Sunday, October 6, 2013
Nirvana BOO Banner by Peggy Lee Baker
Happy Sunday blessings from me Peggy Lee, I am thrilled to share with you all this Halloween project I created using all Nirvana Collection!
"BOO" Banner

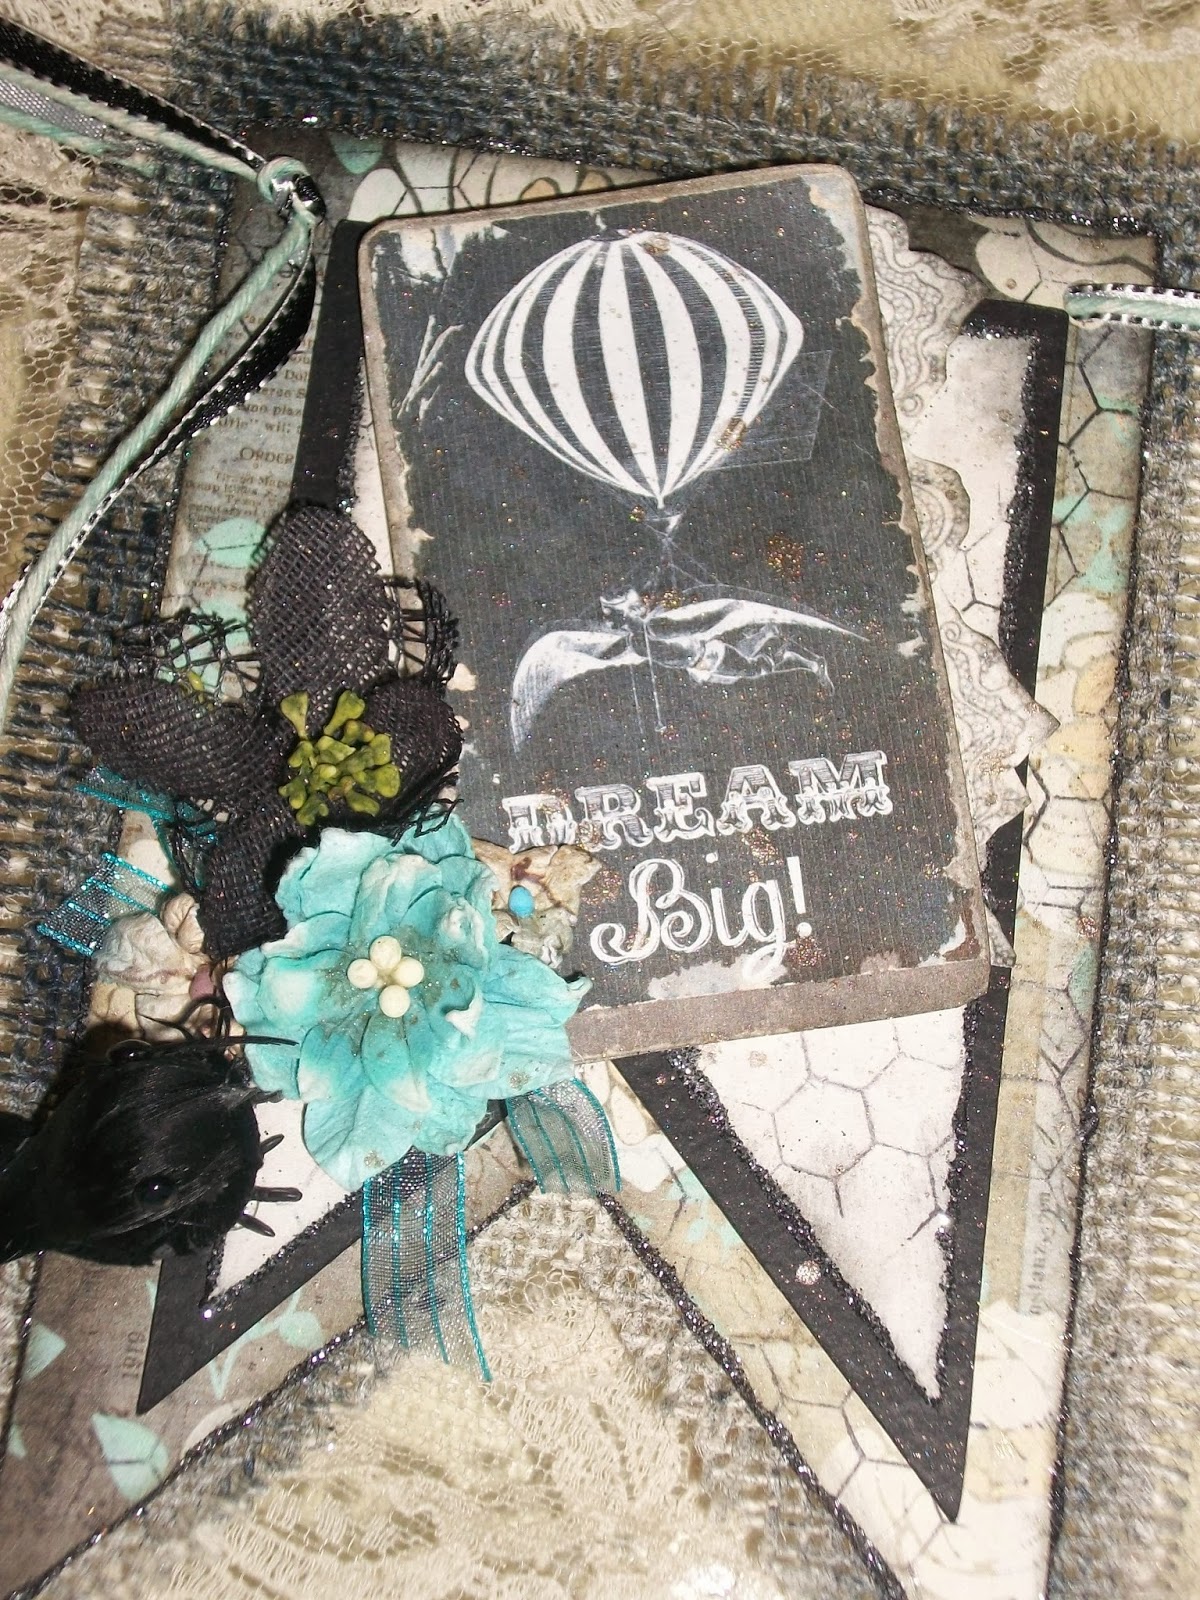
I started with the beautiful Nirvana Collection cut out little banners, backed them on chipboard.
Inked and glittered all the edges.
Using my Cricut machine I die cut out the "BOO" title and banners.
Also glittered over the black letter "BOO".
Used burlap for the banners backing and sprayed with glimmer mist...frayed the edges!
Embellished with flowers, trims and tiny little black birds.

Here is a close up of each banner!


I would love to encourage you to create your very own Halloween project,
using this beautiful Nirvana Collection.

how adorable are these little black birds....

Thanks for stopping bye today,
hugs
Peggy Lee
Supplies:
Nirvana Collection by Marion Smith Designs
Petaloo: flowers-Darjeeling wild mini blossoms in blue
and Mixed Textured Elements in black.
May Arts: ribbons
Ranger: Distressed Ink-black soot, Perfect Pearl
Mists in blue patina and heirloom gold
Stampers Anonymous-Tim Holtz Mixed Media stamps
Beacon 3 n 1 glue
Tattered Angels: glimmer mist in Aquamarine and Raven
Burlap
Halloween black birds
chipboard
twine/jute

Saturday, October 5, 2013
Nirvana Pumpkin Canvas by Tonya Gibbs
Hi everyone, today I wanted to share with you a 10x10 mixed media canvas that I created using Marion's Nirvana line.

I used the b-side of Up And Away to cut out my pumpkins and sunflowers. The paper had a Gothic feel with the typography and lace accent, making it perfect for a Halloween decor.

For the pumpkin I cut a simple pumpkin shape out 3 times and used an oval die to separate the sections of the pumpkin. I used really thick fun foam as my pop up dots to keep them dimensional. To color the pumpkin, I used Tim Holtz' Orange Marmalade Distress Stain, combined with the Metallic Bronze Distress paint. Then I used Vintage Photo Distress ink to darken the shadowed edges to accent the 3D curves.

For the spray at the bottom, I used scraps of Nirvana paper I had left over from the pumpkins to cut out the daisy shapes with the Tim Holtz Tattered Florals Die. For contrast against the pumpkin, I decided to leave them their natural color adding a small amount of vintage photo distress ink for depth. For the daisy centers I used a clear rhinestone that I painted with my Copic E29. To finish it off, I added some metal pieces for sparkle, burlap for texture, and a few sprays of berries for depth.
I love that this canvas fits the Halloween / Harvest theme and can hang in my home during the entire fall season.
Thanks for stopping in today,
Tonya Gibbs
Thursday, October 3, 2013
Vintage Halloween Treat Hanger
Happy Thursday! Sarah reporting here with a super fun and easy Halloween project! My favorite part of Halloween is, of course, the treats! And I love creating different & fun ways to hide treats from my kids display our treats all throughout the house. I love love love old vintagey Halloween decorations, so when I was presented with the challenge of creating something Halloweeny with the new Marion Smith "Nirvana" Collection, I was super excited! It has a beautiful vintage feel to it. Here's what I came up with;


I took the "Cloud 9" paper from the Nirvana Collection, my favorite background stamp, and some black ink and stamped the image all over the paper, creating my background.


Then just cut or tear the paper apart after stamping all over it, and mod podge the pieces randomly all over a paper mache cone. It should look something like this;


Then cut out one of the large clocks from the "Family Record" paper, and using black streamers or crepe paper put a fringe around the back edge of it so it sticks out from behind it. (I also added some at the top with some silver tinsel trim which kind of looks like a funny hair cut?!)

Then you basically just layer fun cute things that you want over top of that, and then create a handle out of some ribbon! I used a silver die cut star and an old die cut circle from my stash that says Happy Halloween...


I Love the stamped background!

Using your paper trimmer, slice some old sheet music or book paper into thin strips and crinkle it, creating an awesome filler!

And that's it! I hope this got your wheels turnin and gave you bunches of ideas to make your own. When I was making it, all kinds of ideas were going through my head! I'll probably have one on every door knob in my house now haha!
Here are the papers I used (the ones on the right)


Thanks for hangin out today!
Love, Sarah
Tuesday, October 1, 2013
NEW!! Junque & Gems by: Marion Smith
Hello everyone!
So excited to share with you a new line for the Marion Smith Brand releasing late this month and should be in stores November or sooner!
This is our Junque & Gems line. It is truly unique because no two packages are alike! Each package will come with a variety of charms, gems, metal findings, crystals, lockets, resins, and more!
These are perfect for the mixed media artist, and all the fun little treasures can be used for so many different things. It's like a surprise in each package!
We will give you more peeks through the month and also share a few more releases in the next few weeks!
Hope you like it, and please keep an eye out for them at your favorite retail store!


Here's a cute little flower I made using some bits and pieces from the Junque & Gems line. So easy to do just thread six of the teardrop beads and tie the ends together, add a center junque piece and voila!

Come and like our company facebook page for weekly giveaways! Click here!
Home decor - Love Paris by Ana Paula Leal
Hello!
Ana Paula here to share another project with you!
It was very fun create this Home Decor Project.
I found this wooden piece in a local store and
I think you can certainly find many options of those wordlets in crafts stores too.
I love Paris
and I am going to be in that
wonderful and inspirational city again when you see this blog post.
I was totally inspired by Paris when I created this project.
I painted all the piece using black acrylic paint
and covered the front side using some beautiful papers from the Nirvana collection.
On the corners and the edges some touches of turquoise paint
and finally I decorated with metallic embellishments as:
keys, door locks, watch parts, pendants, etc...
...everything to give a steampunk look that I love
. And of course I could not forget the
Eifel Tower
Oh là là!!!


Subscribe to:
Posts (Atom)